A movie can have up to 8 subtitle tracks. Initially there is only one Subtitle track visible to save space. As you add the subtitles to this track a new, empty track will become available.
DVD-lab PRO allows you to import various subtitles and also adjust timing, text and visual effects.
Add Subtitles
DVD-lab PRO works with subtitle stream as any other streams such as audio or video. The subtitle stream has extension *.sp1..*.sp8
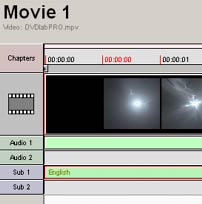
To create new subtitles, double click on the empty subtitle spot:
![]()
A new subtitle window will appear. From this window you can import subtitles, adjust them, set properties and finally compile them to *.sp stream.
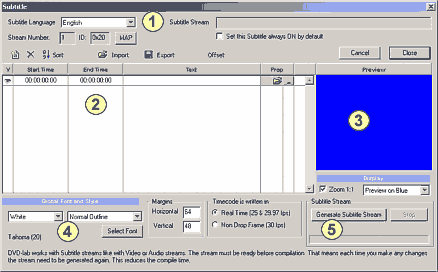
1 - Stream Info
2 - Subtitle Editor
3 - Subtitle Preview
4 - Font and Style
5 - Generate SP file
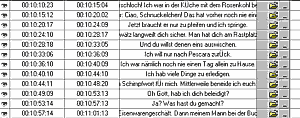
You may wish to create some subtitles right away. Enter start time, end time and type some text.

The time is in format:
HH:MM:SS:FF
For example the time above 00:00:01:00 means one second. A time 00:19:23:12 means 19 minutes 23 seconds and 12 frames.
The edit boxes are set for fast typing. You can use Tab to jump to next box .
The text can be maximum 3 lines per subtitle. You can either type text, import text from few common subtitle formats or import a 4 color bitmap that will be used instead of text.
![]() Note: The subtitle editor in DVD-lab PRO is for simple creating, adjusting and importing existing text or bitmap subtitles. It is not replacement for a more sophisticated subtitle editor. We expect that you already have figured out the exact timing of each subtitle. Adding subtitles on audio cues is a lengthy and delicate process that is best carried in a NLE or dedicated subtitle editor and require perfect audio/video sync that is not possible when using elementary streams. DVD authoring application is never the best place to start creating subtitles from scratch.
Note: The subtitle editor in DVD-lab PRO is for simple creating, adjusting and importing existing text or bitmap subtitles. It is not replacement for a more sophisticated subtitle editor. We expect that you already have figured out the exact timing of each subtitle. Adding subtitles on audio cues is a lengthy and delicate process that is best carried in a NLE or dedicated subtitle editor and require perfect audio/video sync that is not possible when using elementary streams. DVD authoring application is never the best place to start creating subtitles from scratch.
You may look at "Subtitle Workshop", a freeware application from www.urusoft.net, which can be used to add subtitles on audio/video cues.
Import Subtitles
The most common way to enter subtitles is to import them from common text or bitmap formats. Press the Import button on top
![]()
These formats are directly supported:
*.sub;*.srt;*.ssa;*.son;*.sst
Most subtitle editors (such as "Subtitle Workshop") will export subtitles in one of these formats.
![]() Note: Most of the subtitle formats (except *.son) use timecode in HH:MM:SS:DD or HH:MM:SS:CCC where D are 1/10 sec and C are 1/100 of sec. It is important to note the difference. A timecode such as 00:15:49:200 or 00:15:49:20 will be imported to DVD-lab as 00:15:49:06 for NTSC or 00:15:49:05 for PAL which is the same time, but in format that depends on FPS. It is important to note this fact or you will be surprised why DVD-lab "changes" the timecode.
Note: Most of the subtitle formats (except *.son) use timecode in HH:MM:SS:DD or HH:MM:SS:CCC where D are 1/10 sec and C are 1/100 of sec. It is important to note the difference. A timecode such as 00:15:49:200 or 00:15:49:20 will be imported to DVD-lab as 00:15:49:06 for NTSC or 00:15:49:05 for PAL which is the same time, but in format that depends on FPS. It is important to note this fact or you will be surprised why DVD-lab "changes" the timecode.
| Generic Text Subtitle Formats | DVD-lab | ||
| HH:MM:SS:DD | HH:MM:SS:ccc | HH:MM:SS:FF (NTSC) |
HH:MM:SS:FF (PAL) |
| 00:15:49:20 | 00:15:49:200 | 00:15:49:06 | 00:15:49:05 |
| 00:00:05:85 | 00:00:05:852 | 00:00:05:26 | 00:00:05:21 |
You can export back the subtitles to *.srt or *.sub formats and the frames will be transformed back to 1/10 sec or 1/100 sec. Some rounding will apply.
![]() Note: The format DVD-lab uses is 'DVD-ready' and it depends on FPS.
Note: The format DVD-lab uses is 'DVD-ready' and it depends on FPS.
Adjusting Subtitles
You can simply adjust timing by typing a new time to Start Time and End time.
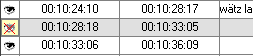
Eye icon. By clicking on the eye icon you can disable displaying of the subtitle at that time.
Loading Bitmap.
You can load a bitmap instead of text subtitle. The bitmap has to be full screen (720x480) with only 4 colors
used - black, white, red and green - 4-bit RLE-encoded.
![]()
Bitmap Format
For subtitles apply the same as for subpicture on menu. It is a mask that use 4 colors (black, white, red, blue) These colors will be then replaced by the Style color and transparency.
The 4-color BMP file will be used this way:
| BMP Color | Used for | Color on screen |
| white* | Background | Transparent |
| black* | Main Color | White or Yellow |
| red | Outline | Black |
| blue | Antialiasing | Semitransparent gray |
*If the bmp image has black background then the black and white colors in BMP will be swapped (Black will be used for background and White will be used for main color). The background is determined from the top left pixel of bitmap.
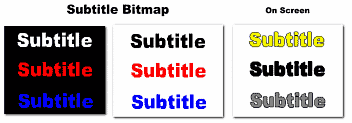
![]() Note: You can apply the Outline and other styles to bitmap as well as it is apparent on the image above (Thin black outline)
Note: You can apply the Outline and other styles to bitmap as well as it is apparent on the image above (Thin black outline)
Font and Style.
Applied to all subtitle rows. This is found on the bottom of subtitle window. Here you can choose the font and a style.
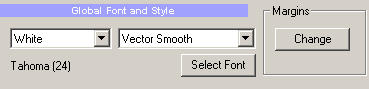
![]() Tip: Best fonts for subtitles are light Sans-Serif fonts such as Helvetica, Verdana, Tahoma or Microsoft Sans-Serif. You should start with size 24.
Tip: Best fonts for subtitles are light Sans-Serif fonts such as Helvetica, Verdana, Tahoma or Microsoft Sans-Serif. You should start with size 24.
DVD-lab PRO allows creating White and Yellow subtitles with various outlines or background bars. Yellow subtitles are often used for their great visibility on any background.
Here some of the combinations that you can create:
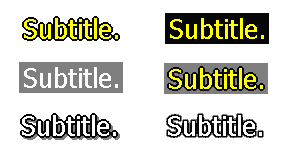
There are two ways how the font outline is created and this affects the overal look of the text on screen:
Bitmap based Styles are all first styles from Outline to Smooth Max, Vector based are last from Vector Outline to Vector Thick Back
A Bitmap based create a rounder, less jagged text. However displaying it on some players may suffer from player poor scalling algorythm.
A Vector based create more crispier text. A Smooth Vector type is set as default.
Here is example of the same font processed through Bitmap and Vector outlining. Both have outline exactly 1 pixel. The Bitmap looks smoother but the letters may look less defined on TV, the Vector will show more jagged letters but it will be optically crispier because of more "air" between outlines.

Subtitle position and Emphasis.
While the font and style apply to all rows, each row in the subtitle window can have few unique properties. To change subtitle properties click on the small button, near the bitmap open.
![]()
This opens the Advanced properties for that particular row.

Here you can set position of the subtitle. Subtitles are by default displayed on bottom center. Clicking on Apply to all Subtitles will apply this setting to all subtitles in the grid table.
A Subtitle Emphasis is other way how to further adjust each subtitle. For example, it is often used in dialogue with somebody off-screen, the first line, in italics, would be spoken by someone out of shot, whilst the second, in normal style, by someone in the shot:

Timecode Format
When importing or writing subtitles in NTSC you have to know if they are written in Drop frame or Non-drop frame timecode.
NTSC

This setting is to distinguish between Drop Frame (DF - 29.97 fps) and Non Drop Frame (NDF - 30 fps) timecode. The difference between NDF and DF is about 3.5 sec. in one hour and that is quite significant for subtitles. If your subtitles are getting progressively late or early, you had choosen the wrong timecode and choose the other setting. Most of subtitles created in external subtitle editors will be probably created in Real Time format (29.97 FPS)
PAL
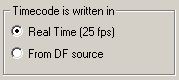
PAL doesn't suffer from the DF and NDF issue, but if you import a NTSC subtitle for PAL project, there is a big chance that the subtitle was written in DF timecode. In this case the subtitles will go progressively out of sync when playing back on PAL. You should use the second option "From DF source" that will first compensate for Drop Frame and then use the subtitles for PAL.
![]() Note: DVD-lab compiles the subtitles to the subtitle stream before you close Subtitle window. Having subtitles compiled before main compilation is a big timesaver. When you do any other changes to the project, the subtitles will not have to be recompiled, but directly the *.sp? stream will be used. Similarly if you do any changes to the subtitles they have to be recompiled.
Note: DVD-lab compiles the subtitles to the subtitle stream before you close Subtitle window. Having subtitles compiled before main compilation is a big timesaver. When you do any other changes to the project, the subtitles will not have to be recompiled, but directly the *.sp? stream will be used. Similarly if you do any changes to the subtitles they have to be recompiled.
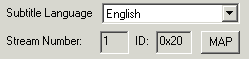
Stream Info
Here you can set the subtitle language and subtitle Map.
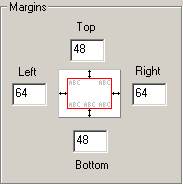
Margins
By changing margins you can define the position of the subtitles on the screen. The margins define the rectangle inside screen in which the subtitles will appear.
Format for 16:9 (optional)
A normal subtitle is formatted for 4:3 TV. A widescreen 16:9 movie is side-compressed on the DVD and so a Widescreen TV need to stretch the image to widescreen format. A subtitle will be stretched with it as well and depending on the font it may look "fat" on 16:9 screen.
![]()
This subtitle will look correctly on 4:3 TV, but on widescreen TV it will look bit side-stretched as the image above.
That means for 16:9 movies we may consider to squeeze the subtitles to something like this:
![]()
so after the widescreen TV stretch the image they will appear somehow normal
![]()
To squeeze the subtitles we have a Format for 16:9 option:
![]()
![]() Note: This option is enabled only if the movie is 16:9.
Note: This option is enabled only if the movie is 16:9.
However, once we squeeze the subtitles they will now appear squeezed on 4:3 TV!
Therefore once you set Format for 16:9 option you have to fully understand what is the main target in terms of playback.
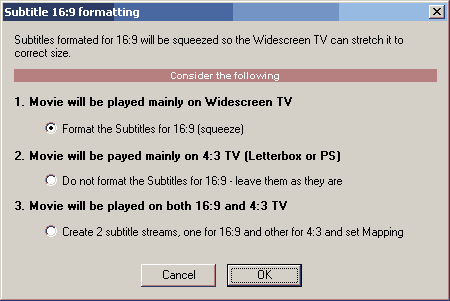
1. You may decide that the DVD will be mainly played on widescreen TV so we would squeeze the subtitles.
2. .. or you may say that mostly people will play the movie on 4:3 TV as letterboxed or PS. We will do nothing and so if somebody plays it on widescreen TV the subtitles will look a bit stretched
3. The third option will create two subtitle streams, one squeezed for 16:9 TV and the other normal for 4:3 TV. Then it will set Subtitle Map (see below) so both streams appear as one single Subtitle 1 on the DVD that is different for 16:9 and 4:3.
![]() Note: It is important to fully understand the Subtitle Mapping feature. After we create first pair of 16:9/4:3 subtitles, we still have created only one Subtitle 1, even if it occupy two subtitle streams inside movie (Sub1 and Sub 2). If we add third subtitle stream we have to remap it to Subtitle 2 because by default each stream is mapped to the same number (In our case the third stream is by default mapped as Subtitle 3, but since we combined stream Sub 1 and Sub 2 to Subtitle 1, we still have Subtitle 2 free - we need to map the Subtitle 3 there). It is obviously vital that you understand the below Mapping feature.
Note: It is important to fully understand the Subtitle Mapping feature. After we create first pair of 16:9/4:3 subtitles, we still have created only one Subtitle 1, even if it occupy two subtitle streams inside movie (Sub1 and Sub 2). If we add third subtitle stream we have to remap it to Subtitle 2 because by default each stream is mapped to the same number (In our case the third stream is by default mapped as Subtitle 3, but since we combined stream Sub 1 and Sub 2 to Subtitle 1, we still have Subtitle 2 free - we need to map the Subtitle 3 there). It is obviously vital that you understand the below Mapping feature.
![]() Tip: Squeezing and then stretching text during playback may not always look good and it requires some experiments to determine the right font type and size. To simplify things we may decide to use just one subtitle for both 16:9 and 4:3 TV. That's nothing bad, some Hollywood movies have just one subtitle for all formats. We may start with a font that is originally a "narrow" or "condensed" font which may look satisfactory both as stretched or normal. (Many of these fonts are installed with Microsoft Office)
Tip: Squeezing and then stretching text during playback may not always look good and it requires some experiments to determine the right font type and size. To simplify things we may decide to use just one subtitle for both 16:9 and 4:3 TV. That's nothing bad, some Hollywood movies have just one subtitle for all formats. We may start with a font that is originally a "narrow" or "condensed" font which may look satisfactory both as stretched or normal. (Many of these fonts are installed with Microsoft Office)
Subtitle Map (advanced)
Widescreen movies can be displayed differently on a 4:3 TV (as letterboxed or Pan & Scan) than on one with a widescreen display. You also have the ability to differentiate which subtitle stream will be displayed on each system. For example you may choose larger font for widescreen displays or move the subtitles below the black bar on letterbox. In such a case Subtitle 1 may use stream 1 for widescreen and stream 2 for letterbox. You will prepare two subtitle streams but on DVD they will appear as only one Subtitle ( that plays differently on widescreen than on 4:3 displays). This "assigning" of streams to Subtitle track on DVD is done through Subtitle Map. By default the map is set so each subtitle stream appears as one new Subtitle track on DVD.
On the image below we see the default map where each stream is a new Subtitle on DVD and also a special situation where we assigned the Stream# 1 (0x20) to be played as Subtitle 1 on DVD for 4:3, LB and PS and Stream# 2 (0x21) to be played also as Subtitle 1 on the DVD but only on widescreen displays. We needed to create two subtitle tracks in DVD-lab, but the result DVD will show only one Subtitle.
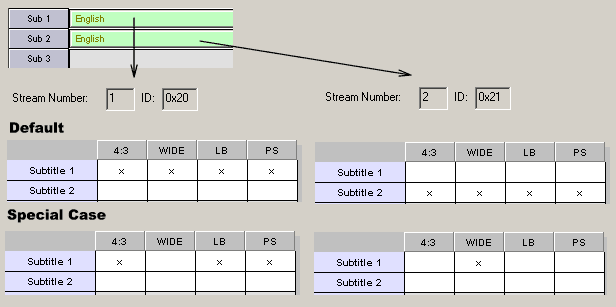
You set the mapping by simply clicking on the grid which will place x to the desired configuration. Clicking on existing x will remove it. When you assign the particular configuration in one stream, it will be automatically removed in all other streams so they don't overlap.
![]() Note: Don't be too concerned about the subtitle mapping if you fully don't understand the function. It is really used only in special cases as the one above. In fact many professionally-prepared
Hollywood DVD's use often the same subtitle stream for all display types (as it is set by default in DVD-lab).
Note: Don't be too concerned about the subtitle mapping if you fully don't understand the function. It is really used only in special cases as the one above. In fact many professionally-prepared
Hollywood DVD's use often the same subtitle stream for all display types (as it is set by default in DVD-lab).
The Subtitle Map has meaning only if the movie is 16:9. If the movie is 4:3, player will never use the Wide, LB or PS settings.
Subtitle quality
The DVD forum defined the subtitles as subpicture mask that can have only 4 colors. That means a subtitle can practically use only 3 shades (one color must be transparent so the movie can be seen through the subtitle background). This is one serious limitation. Because movie under subtitle changes rapidly the best looking subtitle we can make is using one color as the color of text (white, yellow), another color as the outline (black) and we are left with just one more color that can be used to somehow smooth the text.
It is important to know this limitation of DVD specs and understand that the subtitles on TV will never look as good and smooth as a text generated on a computer screen or printer. It is very often work of trial and error to choose the correct font and the size to make the DVD subtitle as pleasing as it gets with these limitations.
Default behavior of subtitles
User can choose subtitles by selecting them from his remote or they can be selected programmable: from menu button (Link - Subtitle) or using a VM command SetSTN (subp=0:on )
The selection of subtitles will be remember during playback of DVD in the current VTS.
In a perfect world the subtitles are set to OFF automatically by player when you insert new disc. But here are exceptions:
Unfortunately the DVD specifications do not allow for changing the subtitle register globally. You can change subtitle only while in VTS domain.
![]() Tips (advanced)
Tips (advanced)
1. You cannot set SetSTN or use Link-Subtitle in the VMG menu
2. The DVD-lab will set subtitles Off only once in the first (hidden) VTS menu. If you want this to happen you must obviously let user to go to VTS ROOT menu before he can start playing movie or call playlist. This reset will happen exactly only once, next time you get to ROOT menu the subtitles will stay as selected.
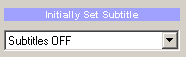
3. Set Subtitles OFF in the UOPs & Settings on a VTS menu if you want to make sure the subtitles will be switched off everytime user gets to this menu
4. If you want to be sure the movie always starts with subtitles off no matter previous settings, you can set subtitles to OFF in the UOPs & Settings of the Movie
5. With VM command you can create your own Subtitle management based on storing values in some GPRM and then setting them before movie plays with SetSTN (subp=GPRMx:off)
Please note GPRMx with value [0...8] will set that subtitle OFF but GPRMx with value 64 + subtitle[0...8] will set it ON:
Examples
This will set first subtitle (0) to OFF - that means on most players no subtitle will be shown.
GPRM1 = 0
SetSTN (subp=GPRM1:off)
This will set first subtitle (0) to ON
GPRM1 = 0
SetSTN (subp=GPRM1:on)