GO! Tab |
We are almost there, you just need to specify the output folders and few things...
![]() DCE AutoEnhance will never allow you to overwrite the source files. You may like it or not, but trust us, this is very IMPORTANT safety feature.
DCE AutoEnhance will never allow you to overwrite the source files. You may like it or not, but trust us, this is very IMPORTANT safety feature.
In any case it is highly recommended that you always keep backup of your original files and promise one thing: Never delete the original files unless you are absolutely sure about it and manually checked that each of the result image is fine.

By default DCE will save the output files into sub-folder \DCE of the original image folder.
You can also specify a folder or let put the output files into same folder as source.
Mirror folder structure of source images
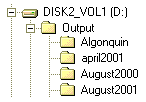
In case when you specify an output folder you can also let DCE create subfolders inside similar to the source. For example if you have source images in various folders the structure will be mirrored in the output folder.
 |
 |
| Here are our source folders | We let DCE save the output files to D:\Output\ with Mirror folder structure |
|
All the files will have added _DCE after the name. (This is another security feature to make sure the source and result files are clearly different) |

DCE can allow you to replace a files if they are not the source files. That means you can run the same batch process again with different setting and the previous output files CAN be replaced. You can allow this by checking Replace already existing Files. You should be careful not to overwrite wrong files.
The Log is always created, but you may want to get detailed log with all the steps described. The log is accessible from the DCE tab once you run the Single Image or Batch Process:

The last thing is to set output format (remember the JPG quality settings are in Size & Quality TAB) and press All Files for batch processing all files from Cue List (with check marks) or Current Image Only for a Single Image process.

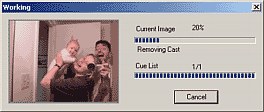
The process is quite nice to watch since you see the exact process being applied and the thumbnail changes accordingly. It takes time to process a large number of images so you may let it work overnight.
If you need to stop the process, press Cancel. It may take few seconds to react until the last step finishes.
A successfully processed images will remove their check mark from the CUE List. That means if you Cancel the process in the middle, next time you press All Files it will continue where it stopped.
DCE will try to do its best tricks on the images, however a manual check after the process is finished is highly recommended. Because DCE is an automatized process some difficult images may not look that good even with the flexible setting DCE offers. You can process such difficult images afterwards one by one or in a small batch with a customized settings.
If you ever need to re-process files you should do it from original files - not from already processed ones.