On the Color Tab there is a switch for effects.
DVD-lab PRO menu capabilities are far beyond simple 2D graphic editing. In fact you can easily create hundreds of 3D-like effects, that are normally difficult to create in any graphic editor. These include realistic light-reflected bevels, various glass or magnifying effects, shiny metals, chrome or gold and much more. This is another very unique feature of DVD-lab PRO.
![]() Basic Effects
Basic Effects
On the Color Tab there is a switch for effects.
![]()
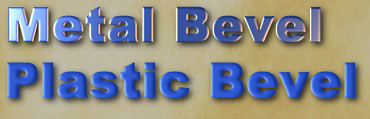
These are some quick, but powerful effects you can apply to an object. These are various types of bevel or glass effect.
Basic Bevel types:
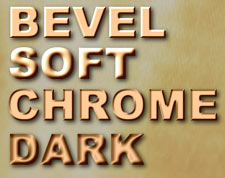
Realistic Bevels
These bevels offer very realistic look of shiny metal or a smooth plastic:
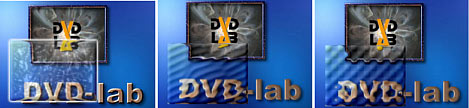
Water Drop
Water Drop object takes color from the background and fill it to the shape simulating watery or glass effect.

![]() Tip: A water-drop effect can be nicely combined with texture Fill Type: Transparent. Adjusting Color-Fill Mix will create hundreds of glass-like effects.
Tip: A water-drop effect can be nicely combined with texture Fill Type: Transparent. Adjusting Color-Fill Mix will create hundreds of glass-like effects.
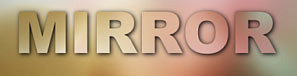
Lenses (Magnifier, Mirror Lens)
These effects works best with large objects. One magnifies what is below and the other displays it upside down.
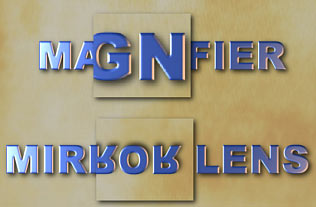
![]() Tip: A mirror Lens effect with drop shadow can be used on a text on colorful smooth background. The reversed mirror effect of the background will create a subtle color difference that is similar to background yet still distinguishable.
Tip: A mirror Lens effect with drop shadow can be used on a text on colorful smooth background. The reversed mirror effect of the background will create a subtle color difference that is similar to background yet still distinguishable.
![]() Texture Fill
Texture Fill
The TAB Fill offers additional texture fills and effects that can be combined with the effects on Color Tab.
The Fill effects will allow you to create many amazing results that can be normally obtained only in special graphic software.
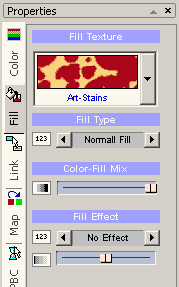
Any object can be filled with a Texture. The textures are fully seamless.
Fill Type
The fill type determines how the texture will be applied to the object.
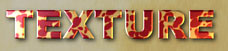
Normal Fill - The texture is filled in the object
Overlay - The texture uses the object color
Negative - The texture is applied as negative
Transparent - The texture affects alpha channel of an object
Color-Fill Mix
This slider will affect how the original color and texture are mixed. On the left side is full color, on the right side is full texture.
Fill Effect
Another set of effects can be applied to the filled texture. The slider below will adjust the effect.
Fill effects combined with texture will allow you to create many interesting effects like metallic shine or gold.
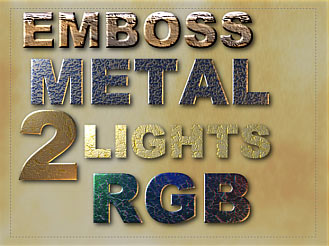
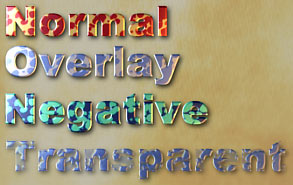
Emboss - a simple embossing of texture. Gives dimension to wood or other non-shiny materials.
Metal Shine - a contrast strong light from left top corner will create shiny sparkles on a fine texture
2-Lights Shine - Two lights from corners will work best on smooth textures to create gold or chrome effect
RGB Shine - Three lights from top will cast Green, Blue and Red light. Good with smooth textures.
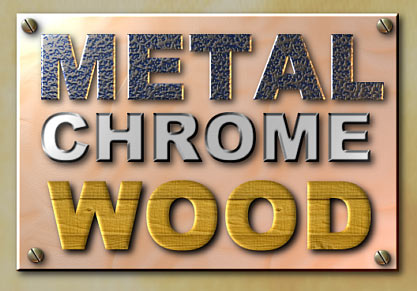
Shiny materials are usually very hard to create in normal graphic applications, but DVD-lab PRO can do this very easy. By combining the texture fills, Bevels and effects you can easily create various materials from marble through metal to wood.
Object Styles
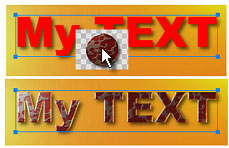
To be able to quickly remember and recall particular object effect, we have a special sub-bin in the Object bin, called Styles.

Style holds only the color and effects attributes of the object, but not the object shape. (Unlike objects found in all other bins)
To quickly reveal the Styles bin, press Show Styles on the Menu tool bar:

Apply Style
To Apply Style, simply drag and drop a Style from Style bin over the object in menu
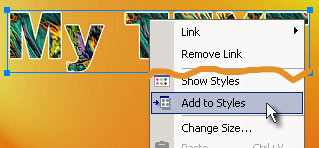
Create Style
To Create a new Style from any object, select the object, righ-click to reveal pop-up menu and select Add to Styles.
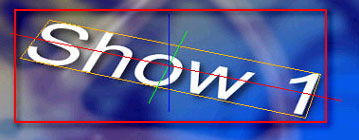
![]() 3D Rotation Tool
3D Rotation Tool
![]()
Any Menu object can be rotated. DVD-lab allows you to not only normally rotate the object, but move it in a virtual 3D space. This is a great way to add some interesting looks to your Menus by tilting, rotating and panning the text, buttons or video stills.
![]()
You can rotate around one axis at a time by holding the keys:
CTRL - rotate around X only
SHIFT - rotate around Y only
ALT - rotate around Z only (same as normal 2D rotation)
![]() Note: remember that active buttons on DVD can be only rectangles. If you rotate a button, the active button space will be the maximum rectangle around the button. This will change the distance how close together you can put two buttons. It doesn't affect non-linked objects. See the picture below which shows the new active area:
Note: remember that active buttons on DVD can be only rectangles. If you rotate a button, the active button space will be the maximum rectangle around the button. This will change the distance how close together you can put two buttons. It doesn't affect non-linked objects. See the picture below which shows the new active area:
![]() Note 2: When you select the object, the bounding rectangle with the resizing handles will remain in the original object position for simplicity.
Note 2: When you select the object, the bounding rectangle with the resizing handles will remain in the original object position for simplicity.