
Previously, we saw how to use visibility to customize what Menu object will be highlighted. That related to a single object only. Now we are going to look at making a group of multiple objects.
For example: What if we would like to have not only the text underlined, but highlighted as well?
For all this and more there is the Group Hotspot feature.
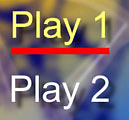
The image above is a modification of our previous example.
1 -We have a Text object and an underline rectangle object with its link set to Invisible Normal.
2 - Select the Group Hotspot tool.
3 - Draw a rectangle (bounding box) to include both the Text object and the underline rectangle. The objects within the bounding rectangle become a Group. The Group Hotspot will pick-up the link from the underline rectangle. Repeat this action to make a group from the second text object and underline object.
4 - When played, both the Text and underline will be highlighted together a Group, each retaining it's original visibility.
The Group acts like a single item on the player, yet we designed this from multiple objects grouped together.
![]() What does the Group Hotspot do?
What does the Group Hotspot do?
First of all, it is an invisible (logical) object for which we can define a link. The Group Hotspot uses all the objects which are behind it (or inside it's boundary) and the properties of these objects to draw the highlighted image. With the Visibility settings applied to the objects behind it, you can determine exactly which objects will be highlighted . In the example above the Text is set to Visible, the underline rectangle is set to Invisible Normal. After drawing a Group Hotspot over them they become one logical button, still retaining these characteristics.
You can move the Group Hotspot away if you need access to an object behind it in order to change that object's properties. You can also add a link to the Hotspot the same way as you would to any other object.
Group HotSpot is a powerful and amazing tool that belies its simplicity.
There are also other object parameters which the Group Hotspot preserves, such as the Color Map Group. You will learn about Color Map in the next chapter, but here is a small example. You can set the Text object to a different Color Map Group than the underline rectangle object, which will allow you to have different highlight color settings for each. Now you group them under Group HotSpot so they become one button, but they will retain their color mapping parameters as well.
![]() Note: The Group Hotspot doesn't necessarily have to be on top of all objects in order to function. In fact, if you need access to the objects
it contains, you can move it back behind all those objects. So it would be fair to say that the Group apply
to all objects bounded by its rectangle.
Note: The Group Hotspot doesn't necessarily have to be on top of all objects in order to function. In fact, if you need access to the objects
it contains, you can move it back behind all those objects. So it would be fair to say that the Group apply
to all objects bounded by its rectangle.
This barely scratches the surface of all the possible uses of the Group Hotspot. Together with the Visibility settings and Color Mapping, it will let you to create any button highlighting possible. You can set the highlighting to exactly what you need.