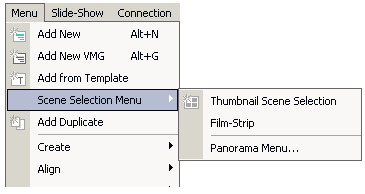
Menu - Scene Selection Menu - Panorama menu
This is a special tool for creating a Panorama menu. Such a menu is not dependent on chapters as previous selection menus and it doesn't even link to chapters. It is a series of still menus and transitions between them. The still menu has left and right buttons. Pressing either one will rotate the view to that direction revealing a new point of interest. The key word is to "rotate". Not just plain slide from one picture to another which you can do with a simple menu transitions or in any NLE, but a real feeling of the camera being rotated.
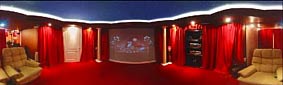
First you have to have a stitched panoramic image, DVD-lab doesn't "stitch" the panorama for you.
A 'stitching' application is used to create one single wrap-around image from series of single images. This application often comes with the camera equipped with panoramic mode (eg: from Canon, Olympus, Pentax ...)
![]() Note: Panoramas are spherical and cylindrical. We will work on cylindrical panoramas - these are the ones you can create with your digital camera and allows moving in the horizontal direction
Note: Panoramas are spherical and cylindrical. We will work on cylindrical panoramas - these are the ones you can create with your digital camera and allows moving in the horizontal direction
Once we have our stitched panoramic file we can continue in DVD-lab PRO:
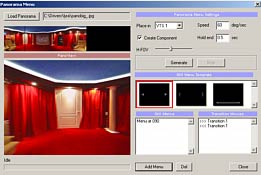
This will open panoramic menu maker:
 |
1 - Preview of loaded panoramic image 2 - Panoramic View 3 - Settings 4 - Menu template 5 - Menu list 6 - Transition List |
First we will load the stitched panoramic image using Load panorama button. The image will appear in preview and also below in the Panoramic View. This view is very similar to the web page panorama views, you can click inside and then drag mouse to rotate the panorama.
H-FOV
If the image was stitched correctly, what you see in the Panoramic view should look fine. Sometimes, however, it may look bit squashed or stretched to sides. This can happen if your stitching software didn't wrap the images correctly - for example if you set that the lens was 20mm when in fact it was a 35 mm lens etc.... but this can be adjusted with the H-FOV slider. The default way is in the middle.
Setting points of interest
We need to choose few places of interests in the panorama that will be generated as still menus. Then the generator will create a transition movies between these still menus in both direction. At the end all will be combined and linked, ready to use.
First we rotate the view to a point of interest and then click Add Still button. Few things will happened: the Still Menu entry will be added and two new transition movies will be added to the right list.
![]() Note: For each still menu we need two transition files to cover both possible directions.
Note: For each still menu we need two transition files to cover both possible directions.

Settings
Speed is measured in degrees per second. Full panorama is 360 degrees. A value between 60 (slower) or 120 (faster) works best.
Hold end of 0.5 second will create the transition that will hold last frame for 0.5 sec. This will assure that when player go from transition to still menu it will not create "jump" but make it smooth. A value of 0.5 sec. is a very good one.
Create Component. All created menus and transitions will be enclosed within new component.
Still menu template
This is a template that will be added on top of the still image in each point of interest. It simply add buttons to right and left so user knows what action is expected.
Generate
It will ask us for a name (as *.m2v file). After that it will take few minutes because the transition movies will need to be generated into MPEG-2 mini-movies.
Here we have panorama with 3 points of interest and total 6 transitions between them.
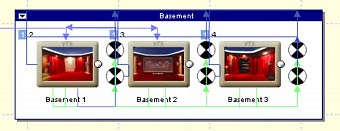
A central dummy button is also added to each menu. This is the default "first" but invisible button. As soon as user press left or right button on remote the left or right button will be activated (they have auto-activate property set) and the transition movement (rotation of camera) is played.
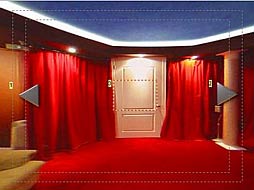
![]() Note: The invisible central dummy button can be also later used to link various panoramas together. For example here if user press enter it may "go" to the room behind the door or go to any normal menu.
Note: The invisible central dummy button can be also later used to link various panoramas together. For example here if user press enter it may "go" to the room behind the door or go to any normal menu.
![]() Tip: You don't have to limit yourself to a virtual tours. Take a panorama image of your desk or room and use vartious items as buttons.
Tip: You don't have to limit yourself to a virtual tours. Take a panorama image of your desk or room and use vartious items as buttons.
The Panorama menu is a generator helper. If you need to change something you have to generate whole panorama again. It doesn't keep the values so once the dialog is closed all settings are lost.
Template
Template is simple *.stm style placed in Styles - Panorma folder. It has one central invisible button or Group Hotspot that needs to be named CENTRAL (in the Button Label) and has to be the first button - it must be on the bottom layer. Then we have one left button named PREV and one right button named NEXT. The background of the template will be replaced by the panorama snapshot. You can load one into menu (Menu - Load menu) and see in detail how it is done.