The first thing to create a new HDR image is to Press "New" button or "Create HDR file" in the Quick Tool palette.

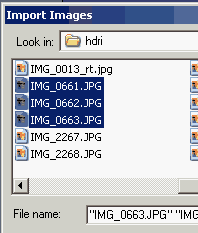
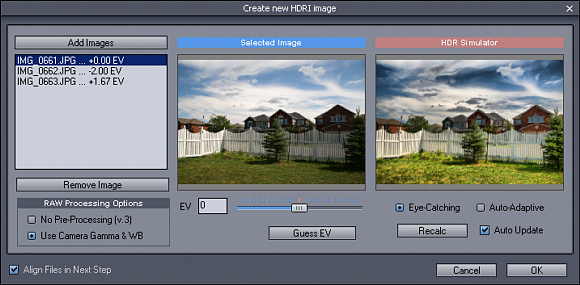
The "Create new HDR Image" dialog will open. Here we can add the images taken with different exposure. This can be done by clicking on the Add Images button. A standard File Open dialog will open where we can select multiple images. You can add normal image files or RAW images from camera.

Other method is to simply drag and drop files from explorer to the "Create new HDR Image" window.
If the images have EXIF information with the EV data, the software will automatically enter the Exposure Compensation value.

In case the image doesn't have EV value recorded, you will need to enter this manually for each image:
![]()
Tip: You can click at the tick marks (above the slider) and drag cursor to move the EV in whole numbers.
If you can't remember the settings, you can press Guess EV button to guess the EV from the image response. This may not be fully accurate.
The EV compensation may be automatically extracted from many RAW file formats. If not, you will need to adjust the EV manually or use Guess EV.
Note: Even if you don't remember the exact EV for your RAW or JPG file, it doesn't matter that much for the final image. Simply leave the best exposure as 0 EV and then adjust the dark image as -2 EV and light image as +2 EV. We will later use Tone-Mapping that is flexible enough to correct the image.
HDR Simulator
The right side image shows a result of a HDR Simulation. This option will Quickly merge the loaded 8-bit images into HDR and then tone-map it using two of the default algorithms.
Thanks to this you can immediately see how the number of images, their tonality and the set Exposure value will affect the final result.
The HDR Simulator doesn't align the images (this will be task of next step). If the files are seriously miss-aligned then you will see blurred preview.
Auto-Update - this will update the HDR Simulator preview anytime you make a change in EV or load/remove image. If not used you will need to press the Recalc button manually.
Eye-Catching/Auto-Adaptive - this tone-map the Simulator using the two common default method. It is only for this particular preview. Later we will see how we can fully use the options on the final image.
RAW Processing options

| • | No Pre-Processing DPHDR will use "dry" RAW data without any camera WB or gamma adjustments. The tone-mapped images will be darker and a higher Gamma needs to be applied during tone-mapping. This option may minimize noise in some RAW files but result may become sometimes a bit "muddy". |
| • | Use Camera Gamma & WB The camera WB curves and camera gamma will be applied to the RAW file during loading. This option usually works better in order to create more vivid images but it may result in higher noise in some cases (when the image is itself of a dark scene with less contrast) |
![]()
If we need to align images (in most of the cases we do), leave the check-box checked.
Press OK to load the images.
Note: You may also try to experiment with the EV settings and override the real values. Your camera metering has a special program to expose the scene to produce best viewable picture, not what is the best exposure. Sometimes a picture with 0EV is actually over exposed and maybe picture with -1EV produce the most even exposition. You may want to "cheat" and set the evenly exposed image as your 0EV and all the other accordingly. You could also NULL all exposures and then press Guess EV which will find the median exposure and derive all other exposures from this one. It may work better than the camera suggested value.
The HDR Simulator will help you to see the approximate result.