The Menu window is where you create your Menu design, add buttons and to link them with other Menus or movies. In the real world, creating Menus and links is the main creative task of the DVD
authoring process and it determines how polished and professional the final DVD product will look.
Therefore DVD-lab puts a strong emphasis on this area of DVD creation. We can say with confidence that the Menu creation module of DVD-lab surpasses that of almost every other DVD authoring tool.
DVD can have two kinds of Menus.
In the PRO version you will see that you can create two kinds of menus. One is called VTS Menu or simply Menu. The other is called VMG Menu. The differences are mostly in limitations of linking to other menus or movies. You can read more here.
In brief: If you are creating a normal project that doesn't require multiple VTS, you can go away just with using normal Menu. If your project has movies that
have each different parameters (for example one is 16:9 and other is 4:3) you may need to use also
one or more VMG Menus.
Both VTS and VMG menus are being edited exactly the same way so the text below simply refers to a "Menu".
The Menu window basics
Safe Area
We will refer to the working area of a Menu as a "canvas', it's shown in Black here. You will notice the two rectangles shown over the Menu canvas. This is called the "Safe Area".
Standard tube TVs are usually set to overscan, that means you can't see the edges and you lose up to 20% of the image that you would see on computer screen.
Make sure that all important information such as text and buttons are places within the Title Safe Area.
Safe Area for Widescreen menus
Widescreen menus that are set to display Pan & Scan on 4:3 TV (Properties) will have Pan & Scan Safe area displayed. You have to limit all text inside this area otherwise people watching it on 4:3 TV will not see it all. You can also set the menu to be displayed as Letterbox (in Properties) and then use whole wide are for your text. For more information, see the end of this topic.
Zoom
You can zoom in or out of the Menu canvas by selecting
the zoom in or zoom out tool and clicking on the Menu canvas where needed. Notice the zoom tools on the main toolbar:
![]()
Snap to Grid
The main toolbar has another Menu related button: Snap to Grid:

This will make designing layouts easier. Snap to Grid is a toggle, click the button to turn the feature on, click again to turn it off. The layout grid is set up in such a way that it follows a 4:3 ratio. With the Snap to Grid toggled on, it is very easy to move objects to line up in a precise manner.
Undo/Redo
The Menu window features multiple Undo/Redo (the number of undos can be set in the Project Properties).
![]()
The Undo/Redo feature keeps track of these object parameters: position, size, color, drop shadow, link.
![]() Basic design
Basic design
The Menu window features many controls and settings. On the right side of the window you have a Properties window with 4 Tabs: Color, Link, Map, PCG and Layers
On the left side is a toolbar with tools for creating text, rectangles, frames, Group Hotspot and chapter still image.
The top toolbar has settings for Navigational routing, simulation and buttons for moving in layers.
![]() Set the Background
Set the Background
You can supply your own image or use one of the DVD-lab supplied backgrounds.
In the Assets window, click the Backgrounds tab:
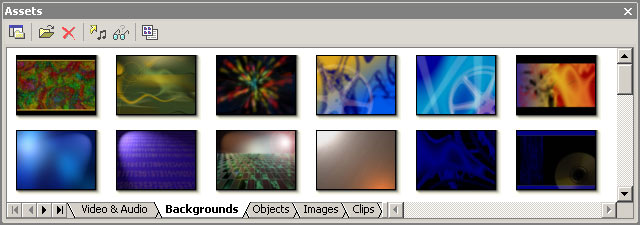
You will see a number of backgrounds available for your Menu. Pick one and drag-and-drop it onto the Menu to set the Background. You can replace the background with a different one at any time.
![]() Tip: You can use a video still frame as a background when you drag the video frame from the Preview window onto the Menu while holding the SHIFT key. It's SHIFT-Drag & Drop. Similarly, you can use any image as a background if you drag it from Assets to Menu while holding the SHIFT key.
Tip: You can use a video still frame as a background when you drag the video frame from the Preview window onto the Menu while holding the SHIFT key. It's SHIFT-Drag & Drop. Similarly, you can use any image as a background if you drag it from Assets to Menu while holding the SHIFT key.
Merge to background
This command in the Menu will merge all objects in the menu onto the background. All links will be lost and all objects will be then deleted.
Guidelines
You can use guidelines to help you place your objects, as you might in many other graphic tools. To create a guideline, simply drag it from the horizontal or vertical ruler onto the canvas..
To remove guideline, drag it outside the canvas.
Objects will snap to the guidelines, if they are moved close to it. Guidelines are saved with the project.
By right-clicking on Ruler, you will open a Guidelines edit box where you can add or delete guidelines by their relative pixel numbers. This offers much precision by defining the exact screen pixel to align to.
DVD-lab allows you to create 16:9 aspect ratio Menus for viewing on a Widescreen TV.
DVD-lab PRO create multi-aspect widescreen menus, that means they are safe to use for both widescreen and 4:3 viewing.
Displaying menus on TV.
The images below explains how are 4:3 and Widescreen menus displayed on different aspect TV's.
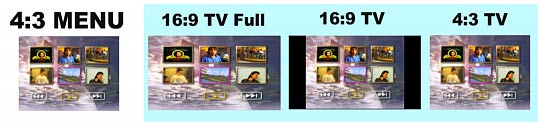
The 4:3 Menu can be displayed on widescreen TV as stretched (16:9 TV Full) or with the correct aspect with black bars on sides. There is nothing to set on DVD, all settings will be done while viewing on the widescreen TV.
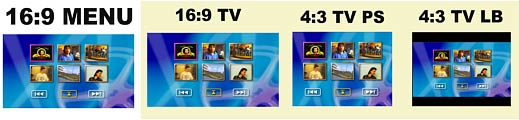
The 16:9 Menu will be displayed as designed on widescreen TV. On 4:3 TV the menu can be displayed either as Pan & Scan or Letterbox. You have to set this settings in properties before you compile DVD.
If you select Pan & Scan you have to remember to have all objects inside the Pan & Scan Safe area. The 16:9 Menu on the example above is a good example of correctly designed menu for PS - in all possible situations the menu will display all objects inside the screen.
A good rule of thumb is that if the main movie is in 4:3 (Full Screen) then you should also design your menus in 4:3. For 16:9 movies you can go with 16:9 menus.
In DVD-lab PRO each VTS can have its own aspect settings. You can have for example one VTS with widescreen menus and other with fullscreen menus. To set settings that are different from global settings set in Properties, right click on the VTS in the Project window and select VTS Properties.