Multi-Camera Editing
 |
EditStudio 6 has direct support for editing multi-camera footage. It uses some of the unique EditStudio properties where the effect (here the multi-camera switching) is applied in its own track and it never touches the underlying videos. |
Multi-camera recording, from the golden age of TV to your desktop
Using several cameras simultaneously recording events such as weddings, parties, live shows etc. is a great way to make your final product stand up. In the past the equipment cost was prohibitive for any larger multi-camera setup, but that is a non issue today.
Even using only two cameras constantly rolling from different angles will give you the ability to make dynamic scene cuts during the long, slow yet for some reason important scenes, to make sure the viewer will not fall asleep; an ultimate dream of any aspiring video maker. However without a reasonable Multi-Camera workflow, the task of later editing multiple camera shots can be a troublesome experience.
We try to address this with this new Multi-Camera plug-in in EditStudio.
Don't touch my precious tracks
In many other video editing software the multi-camera workflow will eventually splice the painstakingly synchronized video tracks creating large number of cuts and make it hard to go back when you change your mind. Further editing cuts on such spliced video will very often result in mistakenly moving some of the video pieces and losing the camera synchronization. Not to mention that some of the camera tracks may already come in few pieces if that camera was paused.
It is a recipe for a permanent headache - we don't want to point fingers, but this is actually how many of the mainstream software somehow
imagine their multi-camera workflow.
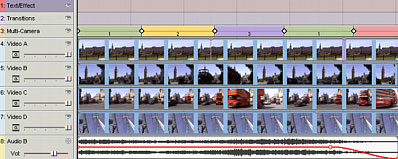
This simulates heavily spliced takes other software will gladly produce
as a result of multi-camera editing. If you touch it, it is a big chance you will
break the sync between cameras and the audio track.
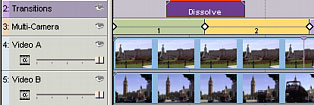
Our approach in EditStudio 6 is much more elegant. The Multi-Camera is in fact a single Effect that you will place on a separate Effect Layer on the timeline. It will show the familiar 4 quad view and you simply add a keyframe where you need a camera line cut and then set the desired camera switch.
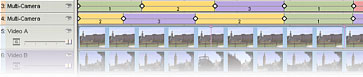
Our indirect-editing approach. All edits are done on the Multi-Cam track.
This makes later very easy to move the cuts, delete them, add a new one or use different camera without worrying about the video tracks being all messed up.
The multi-cam effect also indicates which camera is "hot" during scrubbing or playback on its 4-quad monitor.
But not only that, you can actually make multiple versions of your edit by simply adding new effect track with new Multi-cam, do the line cuts a different way, then compare the edits. This is almost impossible to do in other software that splices the actual video tracks unless you start a new project.
Multiple versions of the edit - no problem, just add more Multi-Cam tracks.
Adding transitions could be another source of headaches with heavily spliced videos. Not in EditStudio Multi-Cam plug-in! Just move the transition layer above the Multi-Cam effect and simply add transition over the desired key-frame and set the correct from-to properties.
You may see that this workflow has a lot of advantages. It is a sort of "virtual" editing where all the edits are in separate layer (the keyframes in Multi-Cam plug-in)
The Workflow
You can add cuts to the video using buttons, using mouse or using keyboard shortcuts. The cuts on the timeline are color coded for better navigation and correspond to the colors of the camera buttons.
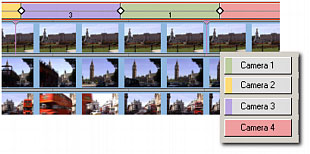
The currently selected camera on timeline will be highlighted in the 4 Quad view as well as on the Camera button
Preview Monitor Configuration
At any time you can switch the preview from 4 Monitors to the Output OSD or the Final Output - that will show your line cuts as they appear on a single monitor:
Output OSD will display the single screen with the camera cuts and it will add OSD camera display in the corner.
Final Output will display the single screen with the camera cuts without anything else - this is for the final export.
With the Final Output Monitor Preview and the Multi-Cam selected you can still watch the "lights" on Camera buttons in the plug-in Properties to see which camera is active.
Obviously if you are going to export the movie, switch the Multi-Cam to the single Final Output as well.
Transitions
Adding transitions is very easy, first move the transition layer above the Multi-Cam if not already there, just click and drag it up:
Then add transition effect over the keyframe. It doesn't have to be exactly precise, just make it cross the key-frame.
Set the correct From layer and To layer of the transition so it corresponds to the same cuts as the Multi-Cam does before the Keyframe and after the keyframe.
Effects
If you need to add additional global effects, such as Color correction or Curves settings, that should apply to all the cameras, create new effect Layer above your Multi-Cam layer and simply add color effects there. Marked as Curves (1) on the image below.
If you need to adjust one camera in particular, for example to Color correct Camera on Video B track, add Effect layer above this track and place the desired effect there. Marked as (2) on the image. Now in your Multi-Cam effect you will change the assigned Camera 2 from Video B to the Effect on Cam 2 layer.
That's all!
Tip: If you want to produce Final Output including 4 quad view (for example as an effect) and you don't want to have the red rectangle around one quadrant, download simple quad view from here.
Some Tips and Tricks
Pre-Sync
Before you start filming, you have to think about syncing the footage. If you had previously done any multi-camera editing, you know that with all the amount of footage from multiple cameras and all the wedding scenes that tends to blend into utter chaos the very next morning, it is a very tiresome experience for somebody sitting behind editing station at two o'clock in the night to guess the sync without some sort of visible and obvious clue. This should be one important thing to remember before you even start.
A professional crew uses "Jam Syncing", which is not as the name suggest smearing marmalade on the bride but rather plugging all cameras into a
time code generator.
This is often not an option for a normal
video maker (although you may try to suggest the marmalade part which could work very well in our opinion). However a
favourite method of Hollywood, the clapboard, usually is. A somebody who usually pretend to be Hollywood film-maker to impress the girls would call it "sticks".
You don't actually need sticks (here, here), just enlist some of your bored crew member, or a lonely bridesmaid to stand where all cameras can see her. Start the cameras rolling and let the person to visibly clap or jump or do something equally enjoyable (or humiliating if it is your sleepy crew
member). Alternatively if all your crew members, bridesmaids and friends deserted you or it is not appropriate for a sane person to jump and clap in front of a president, hungry lion pride or both, just quietly start all cameras, dust off your digital photo cam with working flash and take a good nice picture of the scene (with the flash of course!). Just make sure nobody else get the same idea at that particular time. Or feed the lions...either one will make a good, memorable sync point.
Once rolling, keep on going
After you sync the cameras (by any of the combination of jumping, clapping, flashing(?), feeding the lions or bridesmaids) do not stop or pause, just keep rolling.
Pausing the camera is a sure way to make the editor person to hate you, because he will need to re-sync the footage, if he actually spot the unexpected pause at all in the loneliness of the wee hours.
If you need to pause for any longer time (filming in a bathroom may be viewed as distasteful even if you try to explain the awkward syncing issues), stop all your cameras and then try to later sync them as before.
If you still need to re-sync the cameras in editing (for example tape change, or slippery fingers on the pause button) look for obvious clues such as eye blink of a person, photo flash or groom sneaking away (the latest may not be always readily available).
Use the same model of the camera
Or at least similar models. Different models will produce differently looking picture and white balance which will need to be adjusted... or pretend the issue doesn't exist and call everybody else colorblind and your footage
marvellous.
Audio
It is common that one camera will be set as the main audio source and used as a primary sound source because you want to have the audio constant, not change with the camera cuts. Eventually you may simply bring up sound from different camera as needed (somebody speaks close to Camera 2 etc..). You usually want to use external microphones for the main audio Camera as it will be much easier to control the sound.
You may try to also use external audio recorder for the whole audio to obtain better quality, but it may be problematic or impossible to synchronize this one with the video if you don't use time code generator. (Jam, remember?). Recorder without time synchronization with video may get progressively out of sync with time.
Do not try to top MTV
Wedding should not be cut like a rap video (unless it is a rap wedding). You have to remember who will be viewing your edit and that often includes minors or folks over 90. Do not try to trigger seizure in them with machine-gun series of fast cuts. Edit peacefully with the music... your job is not fast forward through the whole footage in five minutes, the viewers can do it by themselves.
You can use multi-cam even for small family celebration
This doesn't mean the family has to feel like they are filming an episode of Mexican soap opera. You don't have to enlist your uncle and grandma as your film crew. And you definitely don't have to call your
neighbours to make the laugh track.
You can put small cameras on tripods strategically placed in a few corners, switch them on and leave them alone. Then perhaps use just one camera as you would normally do to film any family event by caring it around. But this time you will have much more footage to fill up your hard disk from all the secret eyes in corners... and so you can see who was secretly munching on the cake or who drank all the vine when you were looking away. This will sure made the final cut from your event much more popular.
Images on this web-site were captured with
UltraSnap and created with Real-DRAW PRO