Chapter Points are used for quick navigation through the movie using the Next/Nrev chapter buttons on the viewer's DVD player remote control. Adding a Chapter Point to a movie creates an internal marker available to DVD-lab that a number of features can then reference. You can have a Menu button jump to this place in the movie for example.
![]() Add Chapter Point
Add Chapter Point
To add chapter point press the [+] button on top of the movie cursor
or press Spacebar or use action from the jog/shuttle controller assigned to the space bar.
Alternative way:
![]()
Select the add chapter point button, Click on a movie and while holding mouse cursor drag to the required position. (Watch the preview window). When position is correct, release mouse button and the Chapter Point will be added.
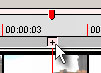
A Chapter Point is indicated by a red arrow. If you click on the red arrow, it becomes selected and its timecode will be displayed above its marker.
![]()
A Chapter Point may also be indicated by a green diamond.
![]()
This is in case if a movie has frame index.
![]() Note: You don't have to add a Chapter Point at the beginning of the movie because this is done automatically.
Note: You don't have to add a Chapter Point at the beginning of the movie because this is done automatically.
The chapter time is always displayed in non-Drop format (NDF) for NTSC.
![]() Delete Chapter Point
Delete Chapter Point
Select the Chapter Point you want to delete by clicking on it and press Delete on your keyboard or press the minus sign on the movie cursor below the chapter.
![]()
Alternative way:
![]()
Use the Erase Chapter tool and erase over the Chapter Point or Points you want to remove.
![]() Move Chapter Point
Move Chapter Point
You can move existing Chapter Point with the Move Chapter tool
![]()
Select the Move Chapter tool and then click on a Chapter Point and hold the mouse button down. Then move the chapter left or right. Release the mouse at new position. A thumbnail associated with the chapter (later used in scene selection for example) will be also changed.
![]() Move Chapter to Previous/Next I-frame (Only for Frame Indexed chapters)
Move Chapter to Previous/Next I-frame (Only for Frame Indexed chapters)
You can move selected Chapter Point left or right in I-frame steps. (The smallest possible step where chapter can exist on DVD)
![]()
This will move the chapter itself, but the original thumbnail associated with the chapter (later used in scene selection for example) is not changed.
![]() Tip: You can first select a visually good frame, add chapter, then move it to previous or next I-frame for exact chapter placement. You need to have Frame index for this function.
Tip: You can first select a visually good frame, add chapter, then move it to previous or next I-frame for exact chapter placement. You need to have Frame index for this function.
Technical note: As you are adding chapters or moving them you will discover you can't always add chapter to an exact spot you would like. DVD specifications
require that each chapter point be on an I-frame which occurs approximately every 15 frames. 15 frames is about 0.5 sec of playback. Therefore Chapter
Points can only be placed on these spots which occur approximately every half-second.
This limitation is often solved in professional practice by encoding the
MPEG-2 stream such that - if necessary - extra I-frames will be generated
at specific times to allow for accurate placement of Chapter Points (such as
a scene change or transition).
![]() Add Chapter points by Scene Detection
Add Chapter points by Scene Detection
DVD-lab provides professional level tool to analyze and find Chapter Points for you automatically by using scene detection. See Movie - Auto-Chapters

You can also click on the Auto-Chapters button on the Preview window.
The Scene Detection tool will look through the video trying to find cut scenes or scene changes, setting Chapter Points there as it finds them. Rather than manually marking Chapter Point ourselves, we can ask DVD-lab automation to help us by marking Chapter Points where it thinks the scene changes.
Sensitivity: This sets how much the Scene Detection tool is sensitive to scene changes. A higher number means higher sensitivity, which also means more Chapter Points will be found. If you set this value too high, say at 250, then every new frame will be considered as a scene change. If you set the number too low, the scene detection tool may not find any scene changes. A value about 220 seems to work best.
Chapter Distribution
This sets how many Chapter Points the software locates optionally the minimum length of a chapter.
Add X chapters in whole movie.
The movie will be divided to X blocks, then from each block the Scene Detection will try to find next closest scene cut. This is the fastest way of adding chapters because the movie doesn't have to be scanned frame by frame. The resulting chapters will be not equally spaced and there may be less than X chapters added if there were not enough cut scenes.
![]() Tip: If you want to equally space the chapters enter a high number for sensitivity : 250
Tip: If you want to equally space the chapters enter a high number for sensitivity : 250
Find all possible chapters + Minimum space X min
This will scan the whole movie and add the chapters when it finds a cut scene. It will also not add another chapter until the minimum space of X minutes is allowed between them.
![]() Note: The scene detection works by analyzing the image. This however depends on the source - if your camera is shaky then the cut scenes will be placed quite randomly. You may try to tweak the sensitivity for best result or simply add chapters manually.
Note: The scene detection works by analyzing the image. This however depends on the source - if your camera is shaky then the cut scenes will be placed quite randomly. You may try to tweak the sensitivity for best result or simply add chapters manually.
The Chapter Points may be then used for adding a Scene Selection menu.
![]() Import Chapters
Import Chapters
To import chapters from external file, right-click on the movie and select Chapters - Import Chapters from the context menu.
You will be prompted to select the chapters file from the disk. You may either select the chapter text file or press Cancel to add chapters manually. Almost any time-based chapter file format is supported. Smart parsing will extract the timecode from any common text file formats and list them in the edit box:
When you click Proceed a searching algorithm will start looking for the frames in the video file to match the entered timecode. This may take couple of minutes for very large files.
Timecode or Frame
A standard way is to enter timecode which is often in form of SMPTE
HH:MM:SS:FF
H - hour, M - minute, S - sec, F - frames
![]() Note: For NTSC timecode can be in Non-Drop Frame or Drop Frame Format.
Note: For NTSC timecode can be in Non-Drop Frame or Drop Frame Format.
However you may wish to directly use frame number, for example 33134 (which corresponds to the 00:18:24:46). In this case select Frame Number in the Format combo box. Entering the Frame is the most exact way of adding chapters. You should consider to have the movie Frame Indexed prior using Import or the chapter thumbnails may be shown incorrect. (However the chapter position in compilation would be ok, the chapters will be placed at the closest I frame number in any case)
For NTSC/PAL you have to choose the format in which the chapters are written. It could be either HH:MM:SS:FF, HH:MM:SS:CCC or frames. For NTSC you need to also select if the chapters are written in NDF or DF time format.
The chapter time will be in DVD-lab interface displayed in Non-Drop Frame (NDF). If you enter chapters using Drop Frame, they will be converted to Non-Drop Frame so you will see different number in chapter.
To avoid confusion, you may consider entering the chapter time in NDF format (so the number displayed in chapter will correspond to the number you imported)
![]() Chapter Lag (Only for Non-Frame Indexed chapters)
Chapter Lag (Only for Non-Frame Indexed chapters)
![]() Note: We assume that in normal project the chapters will be always placed with Frame Index accuracy. You either create frame index manualy prior compiling or let DVD-lab create frame index during compiling.
Note: We assume that in normal project the chapters will be always placed with Frame Index accuracy. You either create frame index manualy prior compiling or let DVD-lab create frame index during compiling.
Therefore the text below will not apply. It apply ONLY if you disallow creating/using frame index for whatever reason.
Since the chapters from the Movie will be on MPEG I-frame markers rather than time based, it may have happened that the Chapter Point starts a just a bit too early (displays a bit from previous scene) when played on a DVD player. Instead of moving the chapter one second later you can use the Chapter Lag option to make corrections to these time points.
First, select the Chapter Point on the Movie which you want to correct and then right-click to show this context menu. Select the Set Chapter Lag option.
You will be prompted with a dialog where you can set the lag (when to play the chapter) to be +1 second after the Chapter Point or -1 second before Chapter Point or None if needed.
We set it to play 1 second after the Chapter Time. A Chapter Point that has had a Chapter Lag parameter set will be displayed as having a (+1) or (-1) sign after it's time value, as shown here.

In this case, the chapter will start playing 1 sec after the Chapter Point.
Movie Branching
Chapters allow you to use a branch object that can play the chapters in any sequence or play only some of the chapters. For more see Advanced objects.
Layer Break Range
If you have project that is larger than DVD-5 you may see a Layer Break Range area as a blue or cyan bar behind the chapters.

This indicates the area of possible layer break on the DVD.
Shortkeys:
| Action | Shortkey | Description |
| Insert Chapter | SPACE | Insert chapter at the cursor point |
| Remove Chapter | Del or Shift+Del | Chapter point must be selected. Del is used also for removing the video, audio or subtitle tracks. Shift+Del can be used only for deleting Chapters. |
| Next Chapter | Page Up | Select next chapter (right of cursor) |
| Previous Chapter | Page Down | Select previous chapter (left of cursor) |