As described in the Quick Tutorial, the Assets window the place to starting creating your DVD project.
DVD-lab prefers the professional approach to DVD creation. This means that there is an expectation that the DVD author has taken care to insure that their source assets are of excellent quality and already DVD-compliant when brought into the DVD-lab Authoring environment. This has numerous advantages, principally that the compile process is quite fast, with much shorter compile times than for other products that need to constantly re-encode non-compliant files each time a change is made. The DVD-lab Author has the advantage of quickly testing the DVD files to confirm any changes they made.

The Assets window shown here has a selection of tabs displayed at the bottom of the window. Each tab selection represents a different Asset function enabling you to see or manage the Bins that contain the Project components.
The Video & Audio Bin tab is the one you will use the most within the Assets window. Files dropped here are checked for validity and are project specific. You can also import an image to this Bin if you need to have the image listed just for this project.
You import files here by simply dragging the file into the Video & Audio Bin from within Windows Explorer or by using DVD-lab's built-in File Browser. The DVD-lab built-in File Browser has the advantage of listing only related files (video - mpg, mpeg, mp2, m2v, audio - mpa, m2a, ac3, dts, wav, aiff, pcm) and most of the image formats. With DVD-lab open on your desktop and the Assets / Video & Audio tab visible, open your Windows Explorer, find the file to import, then Drag & Drop that file into the Assets / Video & Audio window to include that file in your Project.
![]() Note: The role of Video & Audio Bin is not only to collect project-related files but also check their validity. This is the time when the file may be accepted or rejected. The validity check is done by reading the file headers. If the headers are not exactly true (for example GOP timecode is off) some parameters such as Total Time or Average Bitrate will not show the correct value. This doesn't affect the compiled project in any way, it is only a a quick display of information. If you want to know more precise values you can run Bitrate Viewer which will examine the file frame-by-frame and then calculate accurate values for the file's bitrate and total time. Also read more in Frame Indexing.
Note: The role of Video & Audio Bin is not only to collect project-related files but also check their validity. This is the time when the file may be accepted or rejected. The validity check is done by reading the file headers. If the headers are not exactly true (for example GOP timecode is off) some parameters such as Total Time or Average Bitrate will not show the correct value. This doesn't affect the compiled project in any way, it is only a a quick display of information. If you want to know more precise values you can run Bitrate Viewer which will examine the file frame-by-frame and then calculate accurate values for the file's bitrate and total time. Also read more in Frame Indexing.
![]() File Browser, Import files
File Browser, Import files
To open DVD-lab's File Browser, press the File Browser button - the very first button on the Assets Bin toolbar. For the Open File dialog (which is faster) click the second button. With either function, the File Browser or the File Open dialog, you can select one or multiple files. Use Windows' standard multiple file selection methods like <Ctrl>Click for multiple individual files or <Shift>Click for a range of files.
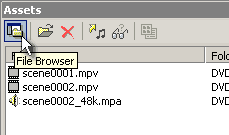
A File Browser behaves just like your standard Windows File Explorer from where you can drag-and-drop files directly into an Assets Bin.
![]() Tip: A valuable shortcut within the DVD-lab File Browser is that you can double click on a file which will then be immediately added to the asset Bin for you.
Tip: A valuable shortcut within the DVD-lab File Browser is that you can double click on a file which will then be immediately added to the asset Bin for you.
Checking Files, Errors and Warnings
As soon as you drop a file into the Video & Audio Assets Bin, it will be checked for validity. If the file is not DVD-compliant, DVD-lab will display a Error Message and a Warnings window will appear descriBing the cause of the error.

![]() Demultiplexing files
Demultiplexing files
Normally, DVD-lab expects to import elementary stream files (mpv, mpa, ac3, dts, ...). However, you may also import non-elementary streams such as MPEG or VOB files.When importing an MPEG or VOB file, you will be given a chance to decide what to do with them: Demultiplex them or use them as they are as the below dialog box shows.

Demultiplexing
This option results in the safest, most compatible asset files at the expense of a little time for DVD-lab to perform the automatic demultiplexing for you. Since the files are first demultiplexed and then re-multiplexed during the Compile process to DVD format, many potential packet related errors will be avoided by taking this option. The demultiplexing processing takes place independently as a background process, you can terminate the process by simply deleting the asset.
![]()
After the files are demultiplexed, DVD-lab will automatically check them and add the new video and audio elementary stream files to your Assets / Video & Audio Bin.
![]() Note: The resulting demultiplexed file(s) will be placed in the same directory where the source file currently is. Make sure you have enough disk space (you need at least the same free disk space as the file size). You can set the destination directory for Demuxed files to other directory by changing the Options in Properties.
Note: The resulting demultiplexed file(s) will be placed in the same directory where the source file currently is. Make sure you have enough disk space (you need at least the same free disk space as the file size). You can set the destination directory for Demuxed files to other directory by changing the Options in Properties.
![]()
![]() Tip: For those using an external software encoder for encoding DVD compliant MPEG-2 video from an AVI file or other source, it will save you time if you select not to multiplex video and audio and to simply output elementary stream files resulting in separate a video and audio file. It saves time in your encoder and also in DVD-lab.
Tip: For those using an external software encoder for encoding DVD compliant MPEG-2 video from an AVI file or other source, it will save you time if you select not to multiplex video and audio and to simply output elementary stream files resulting in separate a video and audio file. It saves time in your encoder and also in DVD-lab.
Use without Demultiplexing
This is a faster method of importing an Asset, but it requires the files are already DVD-compliant. The DVD Compiler is less forgiving when using non-elementary streams. If this option fails, then try Demultiplexing to elementary stream files.
What to do next time
You can set automatic response next time an MPEG file or VOB file is imported by changing the Options in Properties.

![]() Joining VOB files
Joining VOB files
When importing source VOB files, DVD-lab offers a third option. That is, for DVD-lab to join together source program VOB files into one rather large but continuous file. VOB files are divided into 1GB blocks for compatibility with older systems. For joining purposes, DVD-lab requires that your first selected file is the first of the VTS_ named files such as VTS_XX_1.VOB. If you were to then select file names: VTS_XX_1.VOB , VTS_XX_2.VOB, VTS_XX3.VOB (etc.) and Drag & Drop these files into your Assets / Video & Audio Bin, DVD-lab will offer a third option to join all sequential VOBs. When this option is selected, a prompt appears for the disk location of the resulting joined.VOB file which will be a very large file. Consider going out to lunch when this process starts.
When joining is completed. you will notice a joined .VOB file in your Assets / Video & Audio Bin. To make this joined .VOB file into compliant elementary stream files, first remove it from your Assets / Video & Audio Bin with the red X (Remove Asset). Recall that this removal just takes the file out of your Bin but does not delete the file from your disk. Next, open the DVD-lab File Manager, find the joined .VOB file and double-click it to start the demultiplexing dialog as above.
![]() Audio Transcode
Audio Transcode
The DVD specs are quite picky and specific about the nature of audio files. While many formats are "legal", we may encounter WAV or MPA files that work on our local computer, but are not DVD-compliant. Typically, the culprit is the sampling rate. An audio CD is 16bit/44.1 kHz whereas DVD requires 48 kHz for most formats.
If you import an audio file which is not 48 kHz, then you will be prompted to transcode the file.

You can also Audio Transcode a file at any time by clicking the Audio Transcode button in Assets bar.

In special cases you may end up with audio content in the format of a PCM file (Pulse Code Modulation). While a WAV file is technically a PCM type file, this PCM format is not DVD-compliant or usable in most audio editors. This PCM file then needs to be converted to WAV format (use add WAV header). To accomplish this, DVD-lab provides a built-in PCM->WAV tool for your conversion convenience.
See more in Tools.
![]() Previewing files in the Asset Bin.
Previewing files in the Asset Bin.
You may want to preview a file that is in your Assets / Video & Audio Bin to see what it contains. To do that quickly for a video file, you can simply drag-and-drop it into the Preview window or simply double-click the file.
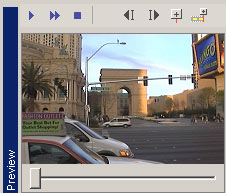
The Preview window shows video content. For audio content, DVD-lab passes the audio file to whatever application the Operating System thinks is associated with that file type (WAV, AC3, MPA). Whatever plays that file on your system outside of DVD-lab gets called when a preview of that audio file type is requested.
![]() The Library Bins
The Library Bins
There are other Bins available to you in the Assets windows besides just Video & Audio. These are Permanent Bins. That means the files in these Bins are available for all projects. You may think of them as your library. See the tabs at the bottom of the Assets window. When DVD-lab was installed, it created a series of folders within whatever folder the DVD-lab program was installed into. These obviously named folders contain the files that represent the Library Bins. You can add you own files into the folders as needed.
Backgrounds Bin
Here DVD-lab displays files that are in the Backgrounds folder. Any file dragged from Backgrounds Bin onto a menu window will fill the menu background. You already have a quite large set of professional backgrounds supplied with the DVD-lab installation. These (.BKG) background image files reside on your disk in a folder named Backgrounds within whatever folder the DVD-lab program was installed into.

To add more backgrounds images to this library from your own image files, simply drag-and-drop that image file from the Windows Explorer into the Assets / Backgrounds Bin. That image file will then be physically copied into the Backgrounds folder. When creating your own images, note that menu backgrounds are 720 x 480 pixels, 24 bit color in PNG format.
Objects Bin
Next Bin is for buttons, frames and other elements for use in building menus. These Objects are transparent PNG format files so they perfectly blend into the background.

You can create more buttons and frames with software such as Mediachance Real-Draw Pro (In fact all the files you see there were originally created in Real-Draw Pro). The Objects are organized into a few sub-Bins. These sub-Bins are representations of sub-directories within the Objects directory. You can create your own sub-Bins by simply creating a new folder in Explorer. The next time you open DVD-lab you will notice that new sub-Bin.
A special case is a "Styles" sub-bin. Here are stored often used object styles such as color, textures etc. You can apply the style by dragging it over any menu object.

Images Bin
This is a tab library for other types of images such as video-stills. It is initially empty. You can easily add video-stills by dragging them from Preview window.
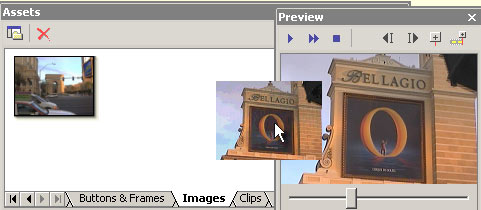
These files dragged here will be again physically copied to the Images folder.
Clips Bin
A Bin for permanent video clips such as various short splash screens used before main feature, etc.

![]() Note: The clips dragged here will be permanently copied to the Clips library, as it's a folder available to all Projects. That means you shouldn't copy anything into here that is too big, The main feature video should be dragged to the Assets / Video & Audio Bin which represents a reference only to the actual asset file on disk.
Note: The clips dragged here will be permanently copied to the Clips library, as it's a folder available to all Projects. That means you shouldn't copy anything into here that is too big, The main feature video should be dragged to the Assets / Video & Audio Bin which represents a reference only to the actual asset file on disk.
![]() Note2: The files copied here will not be checked for DVD-compliancy. It is your responsibility to add only compliant files. You can always check it first by dropping a file into the Assets / Video & Audio Bin.
Note2: The files copied here will not be checked for DVD-compliancy. It is your responsibility to add only compliant files. You can always check it first by dropping a file into the Assets / Video & Audio Bin.
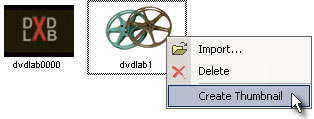
Initially, when you add a new clip to the Clips Bin it will have a default thumbnail. You can easily associate a new thumbnail with the clip if you first drag the clip to the preview, scroll to the frame you like and then right-click on the clip in the Bin and select Create Thumbnail. Whatever is currently visible in Preview will become a new thumbnail for that clip.
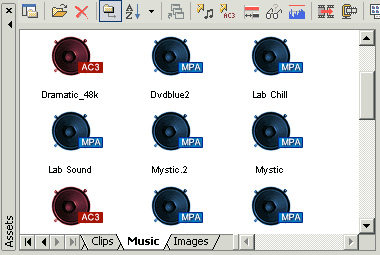
Music Bin
A permanent asset Bin library for short audio clips in mpa, pcm or ac3 format. These music clips may be then used for menu audio backgrounds. A normal length of these clips is about 1 min.
![]() Note: The files copied here will be not checked for DVD compliancy. It is your responsibility to add only compliant files. You can always check it first by dropping a file into the Assets / Video & Audio Bin.
Note: The files copied here will be not checked for DVD compliancy. It is your responsibility to add only compliant files. You can always check it first by dropping a file into the Assets / Video & Audio Bin.
You should store files in Music bin (and other permanent bins) only if you plan to use them often. It makes no sense to copy audio file to the Music bin if it will be used only once in one project - in that case add it to the Video & Audio asset bin (which only stores a shortcut to the file, not the file itself)
![]() Display Files
Display Files
You can switch the permanent assets to display files instead of thumbnails with the Thumbnail/Text button.

![]() Sub-Folders in bins
Sub-Folders in bins
The permanent bins: Backgrounds, Music, Clips and Images can also have sub-folders. This will help you to organize a large amount of item in the bin.

This can be done by simply creating a New Folder in the Explorer under the Backgrounds/Clips/Images/Music folders in DVD-lab PRO installation.

Next time you start DVD-lab PRO the sub-folders will appear in bins.
You can organize the items in the bins by moving the files from folder to sub-folder in the Explorer. You need to move the main file (for example *.jpg) and its associated *.tmb file (if exist)
You can also add new items (like background images) into the bins, by simply copying the image files to the /Backgrounds folder or its sub-folders (if any). You need to close and start DVD-lab PRO in order to see the files in the bins.
This concludes the explanation of the Assets. As with many other things in DVD-lab, you use the Assets by dragging them out onto a Movie or a Menu window.