The final step is to use Process Button to apply the tone-mapping on a full resolution image.
There are two types of final Export:
| • | Process & Save |
| • | Process & Edit |

To switch between the Process options click on the small arrow next to the Process & Edit/Save button.
Process & Save
This will process the file and directly save it to disk.
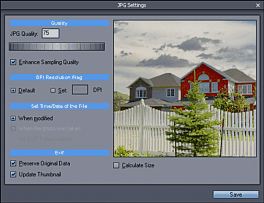
You can choose the export format:
| • | Standard RGB image: JPG, PNG, BMP, TIF, Targa |
| • | 16 bit format - TIFF |
| • | Layered PSD format |
Layered Adobe Photoshop format
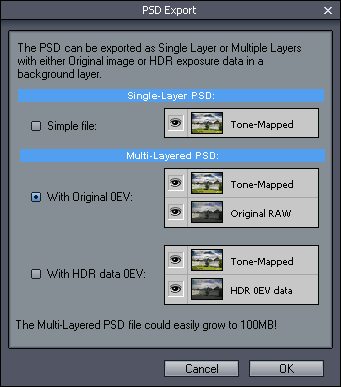
This special case can create a layered format where the background layer will be the original image before tone-mapping and top layer will be the tone-mapped result.The images will be already aligned so you can use layer editing tools in Adobe Photoshop to adjust the image (for example use Eraser to tone down parts of the image or use Layer transparency to adjust the whole image)

Simple file: this create single layer PSD file with the Tone-Mapped result
With Original 0EV: The bottom layer is an original source 0EV (or closest to 0EV) image, either JPG or an 8 bit translated RAW file. The top layer is the Tone-Mapped result. This option require that the sources of the HDR file are known (that is the HDR file was created in this session from source JPG or RAW files)
With HDR data 0EV: The bottom layer will be created from the HDR data using 0EV exposure, the top layer will be the Tone-Mapped result. This option doesn't need to know the JPG/RAW sources of the HDR file.
Depending on the input data, the option that are not valid will be disabled.
Process & Edit
The Image will be processed and then open in a Post-editor for final touch up.
This may include:
| • | Resizing |
| • | Rotating and Aligning |
| • | De-Noising |
| • | Sharpening |
| • | Adjusting Levels, Hue, Contrast |
| • | Barrel and Pincushion correction |
| • | Perspective correction |
| • | Chromatic Aberration correction |
| • | and applying many filters |
For Process & Edit we don't have to specify a file name as this will be done later from the Post-Editor.
Photo-Bee Post-Editor runs as separate process so you can post-edit a file and also calculate another tone-mapping at the same time. You can leave it open as it will catch all tone-mapped files.
After you post-edit the file you will save it from within Photo-Bee post-editor.

Preserve EXIF information.
If the image was created from a JPG file(s), Photo-Bee can copy the EXIF information from the original file(s) to the new image and create new JPG EXIF thumbnail.
