Real-DRAW Basics
Rulers, Guides, Grid, Size Bar
To help you to place and draw objects you can use Rulers, Grid, or Guides. You can drag a guide to the workplace from the Rulers, and objects will snap to them. Alternatively, you can set up a grid where objects will snap to this grid.
Rulers
Rulers measure the distance in pixels. Rulers give you information about the size of the selected object, its position, and the position of the cursor.
![]()
The position and size of a selected object is marked by a red bar (as in the above image), and a blue bar marks the position, and size of a selected object.
When you draw a primitive object, such as rectangle or circle, you will see a blue bar on the rulers as you draw, from the place where you started.
Guidelines
Guides (or Guidelines) are lines that you drag on the canvas from rulers. Guides help you to align or position objects, because objects will snap to guides. An on/off switch for the guides exists on the menu: Edit - Snap To Guidelines.
To move the guide, simply click on it and drag.
To delete the guide, simply drag it outside the window. You don't have to drag it in the guide direction; it is enough for you drag it to the closest border. In other words, you can drag a vertical guide to the top or bottom, even though it normally only operates from left to right.

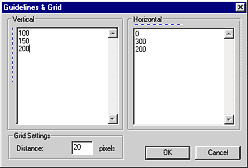
Guides are saved with the document, and you can add/edit the guides by pixels with the Guide editor.
To open Guide Editor, right click on the Ruler or select: Edit Guidelines & Grid from menu Edit.

The Guide editor works like an ordinary editor, you can add, edit or delete the numbers (in pixels) by simply typing. It doesn't matter if you put the numbers in order or not.
Grid
The grid is a net of dots to which the objects snap. You can show/hide the grid from the menu: Edit - Show Grid, or by clicking on the Grid button in the tool bar. The only property of a grid is distance, and you can adjust it in the same Guidelines & Grid box as above. Grid distance is saved with the document as well.
![]() Size and Position
Size and Position
To set the size and position of the object, you can use the Sizes bar. You can show the Sizes bar from menu: View - Properties-Sizes, or simply by clicking on the Sizes Button. (On the right bar)

Above is displayed the size and position of the current selected object. You can type a new number and press Enter to update the object.
Position Lock
On the Sizes bar you have a “lock icons” beside the left and top position. This is a Position Lock. If you click on the lock, the object will be locked in that particular movement and you can move the object by mouse, only in that direction. If you lock the left horizontal position for example, you will only be able to move the object horizontally with your mouse.
![]()
You can lock both directions, and then you won't be able to move the object by mouse at all. This is good if you want to have the object selectable, but you want to protect it from accidental movements.
What is the difference between Position lock and Lock in Layers?
Simple, if you lock the object in layers, you won't be able to select anything it at all as it will become a transparent for the mouse. If you lock the position, however, you are still able to select an object.