To open the Connections view, double-click on Connections in the Project window.
The concept of Connections is the essence of the DVD layout. Connections define how the various elements (Movies, Menus) are connected together.
![]() Why do we need a link?
Why do we need a link?
The links tell the DVD player what to play next when the current item has finished. A typical example is a Movie, when it finishes playing, we can have the DVD player return to a Menu or play another Movie. You can have many Movie segments linked together.
For Menus, dealing with what happens when it finishes is less important. Most Menus have a Timeout value set to infinity meaning they never "stop" playing. However, for those Menus that have an audio background, or Motion Menus or for Menus with a defined number of Timeout seconds, these Menus will in fact "finish" at some point. For these cases, we do need to define a link as to where to go next within our DVD-lab Project.
If a Menu has no link defined, then it is assumed to be looping (to itself).
There are two types of links shown in the Connections view. First, there are the Item or Jump links (from the right side of an object to the left side of another object). These are links that you can draw connections for. Second, there are Button links within Menus. These links show a relationship from where the buttons are on a particular Menu link. Button links are display only, you can't draw or delete these links from the Connections view. You create or delete Button links from inside the Menu window by adding or removing links. Button Links are displayed in a light red color (for Movies) or light blue color (for Menus) and go from the bottom of a Menu to the top of a Menu or Movie.
You can show or hide displaying of these types of links via these Connections view controls.
![]()
![]() Moving Objects
Moving Objects
You can move a Movie or a Menu object anywhere on the Connection workspace. To do so, select the Arrow tool.

You can move these items anywhere you like to better reveal the Connections or group the related parts together, etc.
![]() Drawing Connection Links
Drawing Connection Links
To draw Connections select the Draw Links tool.

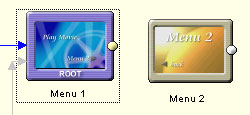
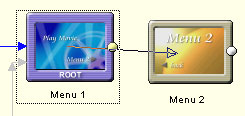
As you add new items you will notice that they are already connected by default. For example, all new movies will return to the Menu using RET command (image 1), the First Play will be connected to the Menu etc. You can leave these as they are or rewire the Connection as you need . For example, to connect movies sequentially (Image 2)
To draw a Connection, click on the Draw Links tool button, then click on the object From (Image 1) and drag the line (Image 2) to the object To (Image 3).
When you release the mouse button the new Connection will be made and a flow relationship is displayed.

![]() Connection restrictions.
Connection restrictions.
Due to various technical reasons, there are few restrictions as to how to make direct Connections.
1. The First Play, Title Button and VMG Menu can be linked either to Any Movie, Any VMG Menu or it can link to First Menu (ROOT) of any VTS.
2. The movies in one VTS can be linked together in any order. They can be also linked to any menu in the same VTS.
3. VTS Menus (using a Duration value or button link) can directly connect only to another Menu or Movie in the same VTS or any other VMG Menu. Don't mistake this with the button links on Menus! The button link on a Menu can link to any Movie or any Menu.
Here is a table for a better overview
| Connect to Movie | Connect to VMG Menu | Connect to VTS Menu | |
| First Play | ROOT Menu | ||
| Title Button | ROOT Menu | ||
| VMG Menu | ROOT Menu | ||
| VTS Menu |
![]() means it can connect to Any of that item
means it can connect to Any of that item
If you look at the table above you will see that these are in fact not that restrictive
to your creative ability.
Trick: You can connect First Play, Title Button or VMG menu to any VTS menu by simply going through a short movie placed in the same VTS (such as 1 sec transition).
![]() Root command
Root command
Movie can return to the ROOT menu with Root command. That means if you start the movie playing from Menu 2 the Root command will return to first menu (Root) when the movie is finished.
To create Root link simply draw the connection from end of the movie to any free area.
 |
 |
| Root - return to ROOT menu. |
Direct link. This time the movie always return to Menu 2, even if it has started from Menu 1 |
![]() Looping
Looping
You can add looping to any item Movie or Menu. As stated before if a Menu has no exit link defined then it is assumed looping. Looping is especially useful for Motion Menu or Menus with audio.
To Draw a loop - click on the end of an Item (right side) and drag the arrow to front (left side) of the same item.
![]() Movie looping - a movie segment can loop to itself, that means it will play forever until you press Menu or Title on the remote.
Movie looping - a movie segment can loop to itself, that means it will play forever until you press Menu or Title on the remote.

You can also "loop" multiple segments together, but that's considered a "link".
![]() Menu Looping - The looping for Menus has meaning only if the Menu is one of the types that will "finish" These Menu types are: Menus with a timeout value set, Menus with an audio background and Motion Menus. For each of these types, we can define a Connection action to take when the Menu "finishes".
Menu Looping - The looping for Menus has meaning only if the Menu is one of the types that will "finish" These Menu types are: Menus with a timeout value set, Menus with an audio background and Motion Menus. For each of these types, we can define a Connection action to take when the Menu "finishes".
Make sure you create a button on a looped Menu by which the user may
escape!
![]() Note: If you don't have audio, nor Motion Menu then setting some timeout value and also looping makes very little sense.
Note: If you don't have audio, nor Motion Menu then setting some timeout value and also looping makes very little sense.
![]() Menu Timeout vs Menu Button Link
Menu Timeout vs Menu Button Link
It is important to see the difference between Menu Timeout (Image 1) and the Menu Button Link (Image 2)
Both features connect Menu 3 to Menu 4, but the Image 1 feature relies on fact that we set a timeout (ex. 10 sec) or there is an audio background or motion video on the Menu. The player will go to the Menu 4 after it has been played or the time-out occurs. If we don't set the timeout or there is no audio,
or not a motion Menu, the link will be never executed.
Image 2 connects Menu 3 to Menu 4 through a Button link. This means user either needs to click on the button or if we set a timeout value (or have an audio background or a motion Menu) and use Force Activate Btn. then the player will jump to menu 4 automatically.
![]() Button Connections
Button Connections
So far we covered connecting objects when the object comes to an end (end of the movie, end of the Menu). The Connection view also allows you to connect Menu items (buttons) to objects. This is normally done in the Menu designer and it is described in detail there.
For better flexibility, you can connect Menu objects to a Movie or a Menu from Connections as well.
 |
 |
 |
|
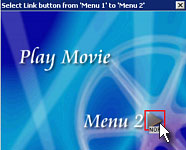
| We want to link the button on first Menu with the second Menu. | Select the "Draw button Links" tool | Drag the Connection FROM the first Menu to the second object (Menu or movie) | A small window with the first Menu will appear where you select the link button. |
![]() Note: Buttons with NOP text are not yet assigned. NOP means No Operation.
Note: Buttons with NOP text are not yet assigned. NOP means No Operation.
![]() Use Connections as your Workspace
Use Connections as your Workspace
You can use the Connections view as your main Workspace. Within the Connections view you can easily add or delete Movie and Menu Items, add clips and audio files to Movies, add backgrounds, still images or buttons to Menus, edit transitions, rename objects. This can all be done directly from the Connections view.
![]() Connection Menu
Connection Menu
When you right-click on the Connection view you will see a Connection context menu as shown above. From here, you can access features such as Rebuild Transition or Rename as well as other navigational features.
![]() Add Empty Movie/Menu
Add Empty Movie/Menu
There are couple of ways how to add new Movie or Menu
![]()
Clicking on a button in Project Window. This action will also open the newly created Movie/Menu as soon as it is created. The object will be added to the first empty place in Connection window following the internal rules.
![]()
Clicking on buttons in Connections bottom bar or using Connections/Context Menu: Add->Empty Movie,... The object will be placed to first empty spot in Connection but the new items will be not opened in their respective windows. In this manner, you can add additional empty items to the Project as needed and then edit them later in their respective view.
![]()
Using Place Objects button in Connection view. This will allow to add new Movie/Menu on the place of cursor. You can continue adding items untill you select other tool.
It may seems that adding new objects is redundant in DVD-lab (it is used in many places) but it is done on pupose. Adding Movies and Menus is the most used function and user can choose the most suitable way to do it.
Here we have added a Menu and two Movie Items, ready for development.
![]() Rename
Rename
You can rename Items by selecting the Item and pressing the F2 key or the right-click Connection context menu and select Rename. Type the new name, then press Enter to confirm it or Esc to cancel.
![]() Size Size / Show Pie
Size Size / Show Pie
![]()
At the top of the Connections view are two buttons for Project statistics. Use the Size and Pie buttons to see an overview of each object's size and percentage of use on a 4.7 GB DVD disc.

See more in options.
![]() Text Notes
Text Notes
![]()
You can add many free text notes on the connection canvas. They can be in any font and any size. They will be saved with the project *.dal file.