Ambient Light |
  
|
Ambient Light |
|
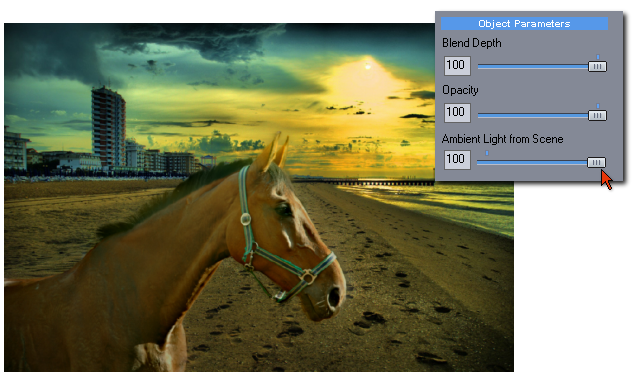
Photo Blend already changed the horse colors to fit into the backdrop. But it can go even further. Depending on the mood of the scene, I may want the object to blend into the backdrop more tightly and be less "in your face".
This is done by increasing the slider "Ambient Light from Scene". Moving it all the way to the right will create scene where the object has very consistent lighting with the background. It sort of reflects the colors from the backdrop and incorporates it into the object itself.
On this backdrop even full Ambient Light is fine because it is pretty color consistent, there are no big color changes across, but on some other backdrops a maximum slider will be simply too much (imagine a green grass and a blue sky, the horse body will get greenish color from the grass and its head will become bluish from the sky - horses are not that reflective as far as I know)
This is all dynamic. It automatically changes with moving of my object.
If I add more objects to the scene, the lighting will also change. This is one of the Phot Blend magic tricks but don't over use it.
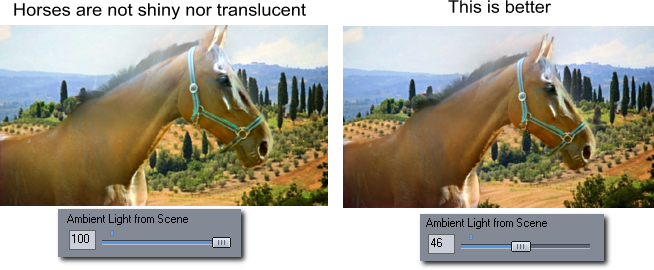
Here is a case of a backdrop where the maximum Ambient Light is just too much to swallow, the horse became light translucent like a looking through a beer bottle. The half way is better, the horse gets some blue sheen from the sky.
Tip: Keeping Ambient Light at zero will make the object the "main" subject of the scene, as if a bit of fill-light is used which is the default setting.
Increasing Ambient Light will make the object blend into the backdrop and became less of an important subject and more of a secondary object.
And then at maximum strength it will make your horses translucent in a glittering brightness of Tuscany day. Life could be so cruel sometimes.