And few other things... |
  
|
And few other things... |
|
There are few other things I had no use during my examples so I will briefly mention them here.
Opacity

I used opacity for the fancy Shadow Clone. But it can be used for any object the same way - making it semi-transparent.
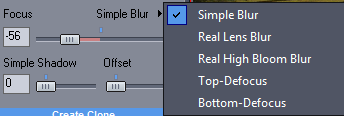
Focus
![]()
This was also used for the Shadow Clone to make the shadow blurry. But it also as an focus for normal objects. Moving it right from middle will sharpen the image details and moving it left will blur them. This is good if we have shallow focus on backdrop and want to place some object in the distance that needs to be out of focus with the rest of the backdrop.
Blur Types
When you move the slider left to blur an arrow with a text will appear to give you more options. The Real Lens and Real Lens with Bloom will try to simulate the defocus of a real lens which is different than normal gaussian blur used in photo editing packages. The last two will do a globally anchored gradient blur, where the defocus is on the top of whole image or on the bottom. Note it is relative to the whole image so moving a small object on top of the screen will make it more blurry than on top (and vice versa).
Menu: Source - Reload from Original
This will reload the colors of the source from the original image. This may be used to update my source if I change the original image in some photo editor. The mask will remain the current mask.
Menu: Object - Info
This will show a detailed info on the current object. The most useful thing for you is to see to what file on disk it links to.
The Full Export Size coefficients are interesting to check as well if the result object seems blurry.
What this tells me how much the source image has to be resized for the Final Resolution export.
If it is below 1.0 then we are downsizing the source image which is good.
If it is above 1.0 this tells me that for the final export the source has to be resized bigger than its original, so we are enlarging the source pixels. That is obviously not good and it means that I just resized it too much on the composition for its maximum capable resolution. (A simple example would be a backdrop of 2000x2000 pixels and source of 1000x1000 pixels. In the composition I can safely resize the object to half the screen height but above that the coefficients will become >1.0 and that means I am resizing my original 1000x1000 image to -for example- 1500x1500)
There are many other things that are more useful to me as a developer to quickly check what is going on.
Removing objects from scene
You can remove person/object from a backdrop by copying the backdrop to the Source with menu Composition- Backdrop -> Source
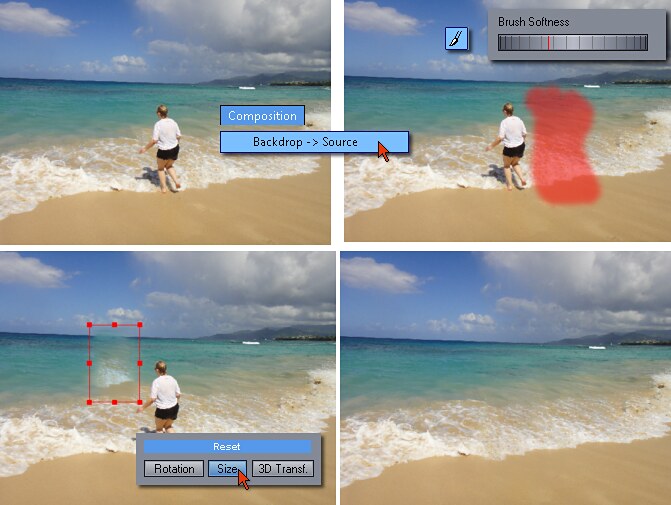
Then draw with soft brush a patch that you would place over the object/person. In composition mode press Reset Size so the patch is the correct size and place it where you want it.
Project Files
Photo Blend saves the project into a PBL files. The draft image is also saved in the PBL project file and so are the links to the original files, but not the original files themselves (the project file would be huge).
That means you can opened a project file on another computer and work on it, but for final export you would need to bring the project back, to the computer where the original files are.