Interface Overview and the Big Concept |
  
|
Interface Overview and the Big Concept |
|
I think the interface of Photo Blend is logical once you get to know it, but it is indeed a bit different. It would be not very productive to start exploring the software randomly and I would suggest to read this guide before you do anything you will regret later. (ok, you cannot really do anything harmful with Photo Blend as it never affect the original images but you may regret not using the software because you didn't figured out how)
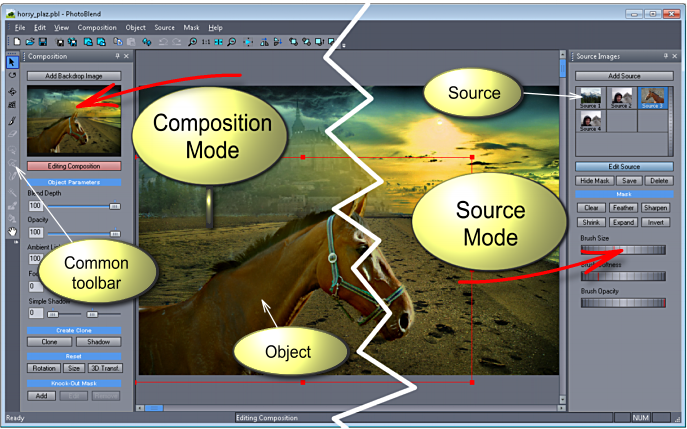
The interface is divided into two halves. This division into left and right tools that map to composition and mask editing was there from the very first moment I started thinking about the software.
Source Mode
The right side pane is a Source mode. I call Sources the images with objects we would like to extract and then stick onto single the composition. You can have many sources, some of them may be even the same file, and you can see them as a those small thumbnails on the right. Editing Source simply means creating a mask over the object with the mask tools (like a brush, curve, magic wand, mask from hue etc...) Once you create a mask over some object it will appear as a movable object in the Composition mode.
Composition Mode
The left side pane is a Composition mode. This is where you load your background, arrange all the objects, size them, set their properties and generally create the scene. While editing in Source Mode is similar to editing in a bitmap editor, editing in Composition mode is more like editing in a vector editor.
So practically when you are in composition mode you will mostly use the pane on the left and when you are in Source Mode you will use the pane on the right.
Common Toolbar
On the left edge of the window is a common toolbar, the tools on that toolbar are shared for both Composition mode and for Source mode and are disabled when not in effect.
Here is the toolbar, I just put it horizontally, but it is the toolbar that is normally vertical on the left edge. It was captured in Composition mode so all the Source mode tools are grayed out.
![]()
Adding Backdrop
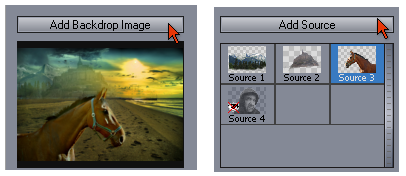
The Composition side has only one image that can be loaded, it is called a backdrop (which is a fancy way of saying background, but I reserve the word "background" for the source images - as in "mask the object from its background"). So backdrop is the image that is on the very bottom of our composition, and in our "Horse on a beach scene" it is the beach.
Backdrop is like a Grand Master of the scene and has few very special roles:
•Backdrop colors gives the beat and the feel to the result image
•Photo Blend will adjust all the objects colors to fit into the background colors not the other way around
•Backdrop resolution will directly determine the resolution of the Final composition image during export
•If things don't look good, it is mostly a poor choice of backdrop
Adding backdrop or replacing the current one is done with the Add Backdrop Image Button just above the composition preview or Add backdrop in the Composition menu. This will open a build-in image browser where you select the image by double-clicking on it.
Adding Source
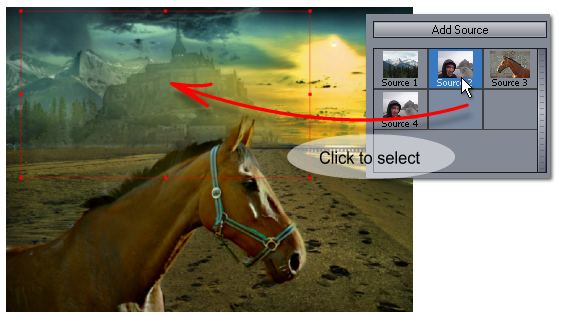
Unlike the single backdrop you can have many sources. You may even have the same source more than once if you need two or more separate objects extracted from one image.
The button Add Source is above the source thumbnails on the right pane or in the menu Source - Add Source. Again this opens the image browser where you select the image by double clicking on it.
Editing Draft and Rendering Full Resolution
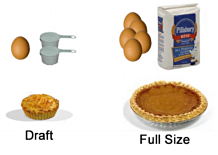
In Photo Blend when you work with any images, you are working in Draft Mode.
It is just like having a recipe for a pie. In Draft mode I am making just a small pie to try it out, with one egg and two cups of flour. If it tastes good then I will repeat the recipe with five eggs and whole bag of flour to make a real size pie for the whole family to enjoy. Similarly when I export the image in Full Resolution, Photo Blend will repeat everything I did in the Draft but now with the full size images and assemble the final large composition to have the same thing, but bigger. |
|
As with trying out pie recipe, the reason for Draft Mode is speed and resources. Using those full size digital camera images during editing will make your computer feel like the glory of windows 3.0 never faded away.
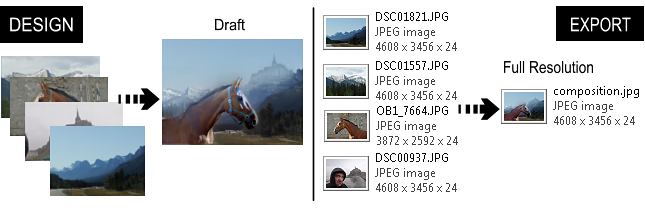
The Draft image is simply a screen resolution image that links to the original much bigger file on the disk. Every image you use in Photo Blend, backdrop or sources will be loaded as Draft and linked to the original file for the final Full Resolution Render and Export.
You will see the Draft Mode showing its face when you try to zoom in to the image too much. A reminder will appear on top of the screen telling you that zooming in the Draft will not give you the full image, you need to Render it.
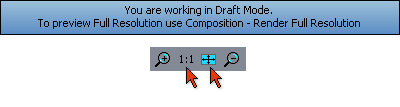
To get rid of the reminder simply zoom down to 1:1 size (which is 1:1 of the Draft size) or even better use the Zoom to Fit (button right next to 1:1) which will fit the image to the whole screen and also shut off the reminder message.
The links between Draft image and the original file means that you should not move or delete those original files on your disk, at least not before exporting the full resolution. Draft Images and the links where to find full size images are saved with project file but not the full size image themselves.
How do you switch between the modes?
That is very simple, each pane has a large Edit button, that also highlights in red to show you in which mode you are in. Obviously only one of them will be red at a time.
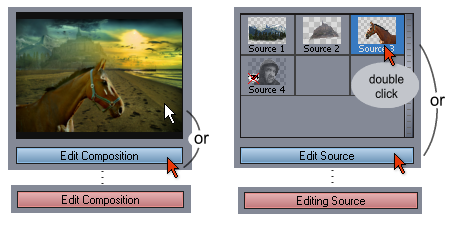
To switch to Composition mode, click the Edit Composition button or click the Composition preview above it.
To switch to Source Mode click the Edit Source button or double click the source thumbnail. Also in Composition mode if you double click the selected object on the backdrop you will get to the Source mode.
Menus are also divided by task. You have menu Composition and Object with tools valid in composition mode and menu Source and Mask with tools valid in source mode.
One final thing: While in Composition Mode you can select an object by clicking at it on the screen, but sometimes objects will be behind each other. You can use the Source list to select the desired object by single clicking at its thumbnail. (Double clicking the thumbnail will switch to Source mode)