When things don't work |
  
|
When things don't work |
|
I wish I can live in a perfect universe. And I also wish every object in Photo Blend works equally good on every backdrop you choose.
But neither seems to be always true. (Since Photo Blend is basically a product of the imperfect universe, I can clearly only blame the universe, right?)
The good news is (with the universe and the Photo Blend in it) that things do work most of the time.
But if they don't, here is what to do (this is about Photo Blend now, I don't know if the same works for the universe):
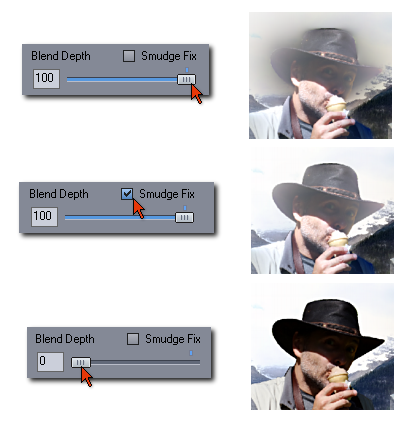
Every object I create in Photo Blend (by painting a mask over it) will automatically use full blend depth so it can fully benefit from color-fit and forgiving masks.
There are cases when this may not work well or not work at all. Most of the time it is a simply backdrop that is too bleak without much features.
One such case would be placing a dark object against a light backdrop or part of the backdrop that is too light. Photo Blend will try to compensate the object by increasing its brightness and wrapping light around it. In a bad case this will look like smudge.
The only cure for this is to actually reduce (and in some cases switch off) the Blend Depth. It can be done manually or dynamically with the Dynamic Blend Depth, in this case: Smudge Fix.
If this fixes the image, why reducing Blend Depth it is a bad thing?
Well, it is not a bad thing, but switching off or reducing the Blend Depth will also reduce the color fit and the forgiveness of masks. For the color there is an easy fix, Photo Blend has color correcting tools that apply to every object separately. For masks, well, you will need to simply create a better mask. So in such case we are back where we said we will never go - the old way of photo composing with very masks and manual adjustments. Touché.
The Smudge Fix is a solution that tries to be in the middle of it. It will adjust the Blend Depth dynamically depending on the backdrop. It tries to keep the Automatic colors but the masks may be less forgiving..
Essentially it will eliminate the Smudge but we will loose Blending Depth over a light part of backdrop and our mask problems will show more clearly.
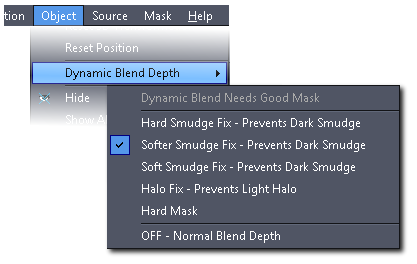
The Smudge Fix can be also adjusted in the menu Object - Dynamic Blend Depth. The checkbox on the left pane will set the Softer Blend, but we have also Hard (a strong effect over light backdrop) and a Soft (a lighter effect). You can get to this menu also with the small arrow next to Blend Depth text.
There is similar fix for a Light halo around light object over dark backdrop. Another option, the Hard Mask will simply switch any blending and most of the smoothing and you will be left with the exact mask you designed.
It is important to say that normally, if things go well, there is no need to use the Smudge Fix or other fixes. (it takes too much computation and it reduces the smoothness of Blend mask)
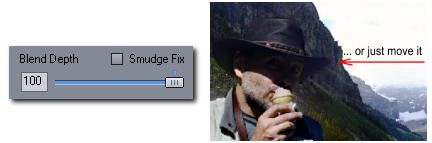
A probably simpler solution would be to avoid placing such problematic dark objects over a bright area of the backdrop.
The very same object will have none of those problems when simply moved to the side where there is a darker backdrop.
If things do not work well in Photo Blend, those things here are the usual suspect.
This is why this chapter is so early in the guide. By choosing certain unfriendly backgrounds you may wonder why your objects have some smudge around them.