Stage Lights |
  
|
Stage Lights |
|

I always love to add at least one feature that would easily stand by its own as a separate application. This fits into my philosophy that software should be able to "grow" with the users abilities and that the user will keep discovering new exciting things as he/she progresses.
Stage Lights is one of such feature that is neatly hidden behind a single light bulb icon. It allows you to add a real-life reflectors and lights to the scene. You probably had already seen some light filters in other programs that pretend it is fantastic idea to add destructive lights (once you apply them, that's it) to your scene based on a tiny little preview in a matchbox-size window.
Photo Blend tries to go far beyond that.
The Stage Lights is fully non-destructive lighting system where you work on the whole screen and can adjust the lights as you please during the whole designing process. Nothing is ever permanent.
But it is not just applying fake flat 2D lights on a photo, it works with the objects and the Photo Blend automatic color fitting in a way where the result may be often reminiscent of a 3D application.

The lights will be applied to the "stage" which is the backdrop but on the same way they will affect the individual objects as well. The system is very robust, the image above shows the original composition in the corner; a Mayan backdrop and my favorite horse. By applying few colored lights the scene changes dramatically.
The image below is the very same scene but with different type of lights. It shows the semi-3D like qualities of the system because it behaves more like a real scene than a flat 2D image.

The Stage Light is a feature that mostly rely on a visual feedback. There is no rule how to do things, you simply place light, move it around and move settings to see what goes with your image.
I will sort of break my own rule here and not going to do this as a step by step guide because due to many settings and variations you will be hardly able to repeat them with the same result.
Light Cone
The light is displayed as a light cone. You may imagine the light cone as a lamp shade with the bulb being the large circle and the small circle will be the top of the shade that is often used to tilt the lamp so you don't burn your fingers.
So when the small circle is near the large one the lamp shines light nearly straight down on the image surface and creates a circle or oval.
When you tilt the lamp, that is when you move the small circle away from the large "bulb" the light will shine on the image at an angle creating a very typical light cone.
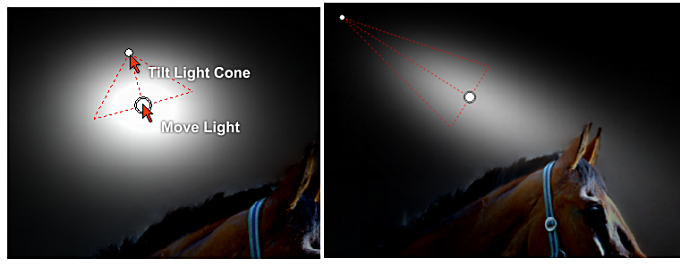
You move the whole light around by moving the large "bulb" circle and you tilt the lamp by moving the small circle.
Left Part of the Stage Lights bar shows the Presets and a global Ambient Light.

Ambient Light is a light on stage that is there even without any additional lights. It is like going into your basement but still somehow be able to see all the boxes even if the light switch is broken. There is all the little light coming from the doors and all the million other crevices that don't fit properly.
In the same sense moving Ambient Light dial will simply lighten the original image with non-specific light. Any normal scene usually have some ambient light, while scene like the one above with the red, green and blue light beams will have zero ambient light so all the lighting will rely on the added lights.
The Presets are pretty obvious, clicking on any of them will load the lights and settings. You can add your own preset with the [+] button and remove with the [-] button.
Note: If you want to add your own presets and have an user account or UAC settings that doesn't allow writing in the program files, you will need to set Run program as Administrator. Simply right click on the Photo Blend icon on the desktop or in the start menu and select Properties. Then Compatibility tab and it should be there.
The right part of the bar is where the individual lights are.
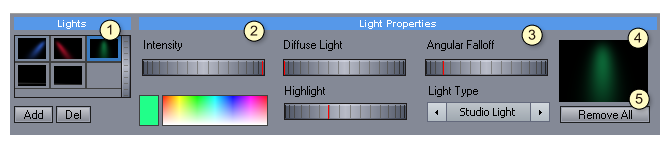
When you first start Stage Lights a single light will be automatically added. You can add another light in the (1) with the Add button. You can select the light on screen or in the table.
Everything right from the Lights table are settings for individual lights.
The Intensity (2) and color is the basic light property. Clicking on the rectangle with the solid color allows you to change the color manually.
The next part (3) is about the advanced Light Properties. This is a combination of how the material reacts to each light and the light itself. An advanced user may realize that in 3D applications things like Highlight and Diffuse Light are a property of how the material reflects the light not the light itself. We don't have different materials, just one image so each light is carrying its own "virtual" material - that is the part of image on which the light shines. This allows for each light to behave very differently.
Diffuse Light
Highlight or also called Specular is how a polished material reflects the light. Looking at a polished material, like a plastic toy or top of a bald guy head under the light will not only show the object lighted but we may also see the light reflection as a much brighter circle. That is the Specular thing. Moving the Highlight dial higher will increase that component so a light circle will become more visible. Look at the very first image with the pyramid, the "sun" is such good example of high Highlight.
Angular Fallow could be also imagined as the size of the light circle or cone or even its focus. The higher is the Falloff the smaller and more focused the beam of light is. In its minimum the falloff is nearly non existing and that means the light goes everywhere around the image. In its maximum the light is a small circle or a thin beam of light.
Light Type - various light types can be selected. The default is Studio Light, that works like a normal reflector would do. You can adjust it anywhere from a soft light to a beam of light.
The Natural Light is another option and it has different way of reflecting light in a far more natural way - like you may see outside. It can be used to tint part of the image without making it too much studio-like.
Near and Far light will simulate a light that is very close to the object or very far from it. With a very close light moving the light cone will hardly shape the light much, with light very far away, it is like walking with a flashlight on X-files that show clearly the beams of light across the screen.
There is also a Black hole light which is a "light that shines darkness". I am sure you must heard of it by now from the many comic book adaptations on a movie screen. It is something that hardly exist in a real-life and instead of adding light it removes the light. So with this one you can darken a particular area of the screen just by shining a light on it.
The (4) is a small preview of currently selected light and with the Remove All (5) you will cancel and remove all the lights and close the Stage Light window. The image will be as it was before without any changes..
Note: The lights (especially if you have few) will add significant time to the Full Resolution rendering, so don't be alarmed by this.
Note 2: You can copy and paste properties of one light into another light
Ambient Light from Scene and Stage Lights
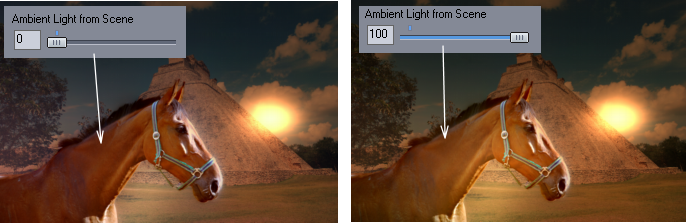
The lights will never directly shine on to the object, but object can "grab" more of the light when the Ambient Light from scene is used. You can adjust it during Stage Lights if you had the object selected or if you select it in the Source List.