|
Combine two or more objects |
  
|
|
Combine two or more objects |
|
Real-DRAW Basics
Combine two or more objects
Menu: Object - Combine Objects
![]() This tool combines two or more, Path, Text, Paint Object or Polynome objects together either as XOR, Union, Intersection or Subtraction
This tool combines two or more, Path, Text, Paint Object or Polynome objects together either as XOR, Union, Intersection or Subtraction
Using a combination of primitive objects is the easiest way how to create any complex shapes.
In the previous example, we learned how to add an Island to an object, however, there is a much easier method, which does exactly the same thing but much more elegant way.
|
We just select a different color of the top object to be visible on the picture.
|
You can combine text, paths, and Polynomes together. The result will be always a Polynome.
You can also combine Paint objects with Polynomes, however the result will be always Polynome. The bitmap object will be first converted into Polynome itself (from its transparency mask) and then merged with the other objects. If you trying to make holes in the bitmap use Bitmap Masking instead.
![]() Tip: Combine XOR a rectangle object and text to get a reverse (cut) text.
Tip: Combine XOR a rectangle object and text to get a reverse (cut) text.

BOOLEAN operations
Combine can have 4 modes: XOR, Union, Intersect and Subtract.

The Subtract depends on the order of selection. It Subtract the 2,3,4... selected objects from the first selected. On the image above we first selected the Rectangle, then the Circle (second image from right). The right-most image was created by first selecting the Circle, then Rectangle.
![]() Tip: The result object will get the formatting (color, texture etc.) from the first selected object. (You can see this behavior also on the BOOLEAN operations image above) When you selecting objects to be combined you can see a number on the selected object. This will tell you which object was selected first.
Tip: The result object will get the formatting (color, texture etc.) from the first selected object. (You can see this behavior also on the BOOLEAN operations image above) When you selecting objects to be combined you can see a number on the selected object. This will tell you which object was selected first.
BOOLEAN vs. All to XOR, UNION
The normal BOOLEAN combination can be freely mixed,. You can for example combine 3 circles as union and then subtract a rectangle from the union. Consider the image below:
The other commands All Object XOR and All Object UNION would simply combine all objects to XOR or UNION and you can freely switch between these two types any time later without re-creating it all again. Consider the image below which was created from the previous object by using menu command Object-Combine Objects-Change Mode-All Object XOR.
And then Object-Combine Objects-Change Mode-All Object Union
We didn't have to re-create the object again, just simply switch the mode.
Whenever you add other boolean operation to such object or choose Object-Combine Objects-Change Mode-Boolean it will return to its original state (that means 3 object Union + one subtraction).
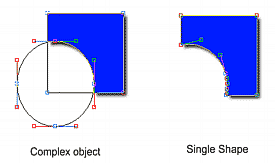
Simplify Complex Objects - Create Single Shape
Menu: Object-Combine Objects-Create Single Shape
Combine tools will create a complex object - with the original shapes still present inside (and thanks to this you can always Un-Combine objects). This is visible only when you do editing with ![]() SHAPE tool. Normally in Real-DRAW it doesn't matter, however sometimes you may want to simplify the object (for example when you planning to do a pure vector export). You can do it in Menu: Object-Combine Objects-Create Single Shape.
SHAPE tool. Normally in Real-DRAW it doesn't matter, however sometimes you may want to simplify the object (for example when you planning to do a pure vector export). You can do it in Menu: Object-Combine Objects-Create Single Shape.
![]() Note: For best accuracy of complicated objects you should leave the result objects in the Complex mode. Create Single Shape may sometimes create less accurate object by applying curve simplification around fine areas.
Note: For best accuracy of complicated objects you should leave the result objects in the Complex mode. Create Single Shape may sometimes create less accurate object by applying curve simplification around fine areas.
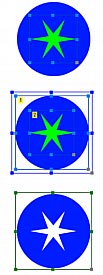
After you create Single Shape then you can no longer use Un-Combine. However, because the result is now Polynome you will be still able in some cases apply Break Apart. (Imagine our Circle and Star example from the top of this chapter - even after you convert the XOR Combination into Single Shape it still has the star as an Island. You can then separate this object into star and circle again using Object-Break Apart.)
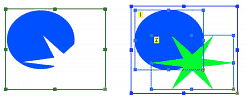
Combine Paint Object
In Real-DRAW you can BOOLEAN combine Paint Object (or even a Package or Bitmap, if you really want) with other vector objects. The result is always a vector (Polynome) object.

On the image above we combined (Subtract) a vector circle with Paint object (painted simply with brush). The result is now fully editable vector object.
The bitmap is vectorized based on the transparency channel. It is obvious that combining simple picture (which has a simple rectangular mask) will not give you anything extraordinary, however it is interesting to combine Paint Objects (Brushes, Nozzles) with other vector object.
General Note about Combine tool
While it isn't very useful in general it is good to know that you can also combine Packages with other vector objects to create new vector object. But here apply the same as for Paint Object - it is vectorized based on the Package transparency channel. There are of course much better way to combine packages (yes, it is Packaging by itself..) Vectorizing packages makes in fact little sense, but you are free to do it.
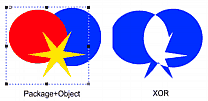
Here we combined a package (red circle+star) with blue circle using XOR. The Package was during conversion treated as simple bitmap object with transparent channel. It is important to realize that if you have package with object having drop shadow (or other effects) then the drop shadow will be also part of the vectorized result. (Because it is a part of the transparency channel)
![]() Note: Reading the above you may wonder if you can vectorize a bitmap which has no transparency - for example a scanned image of your signature. Yes, you can do it with a single command in menu Bitmap-Trace Shape. This will do vectorizing not based on transparency but rather on actual bitmap data.
Note: Reading the above you may wonder if you can vectorize a bitmap which has no transparency - for example a scanned image of your signature. Yes, you can do it with a single command in menu Bitmap-Trace Shape. This will do vectorizing not based on transparency but rather on actual bitmap data.
You can combine object also other way where the formatting is not shared between objects but remain for each object and you are still able to add another formatting on top of the new combined object. It is called Packaging
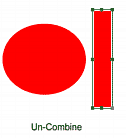
Un-Combine objects
Menu: Object-Combine Objects-Un-Combine
The Combined Objects carry inside their original shapes. As far as you don't convert the Combined object into Polynome (Create Single Shape) or Bitmap, you can anytime Un-Combine the objects.
Here we have Combination Object: Star subtracted from Circle. After Un-Combine the object will be divided back to 2 objects Star and Circle (The Star is shown here in different color, in real life it will come up with the same formatting as the main object)
Menu: Object-Break Apart
The Combined Object/Polynome will be broken into two or more independent Single Shape objects.
There is a marginal difference between Un-Combine and Break Apart.
The Un-Combine will always separate Combination object into the original objects. The Break Apart will cut the Combination object into smaller Shapes depending on the Combination.
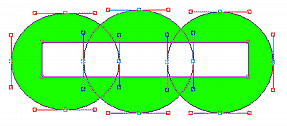
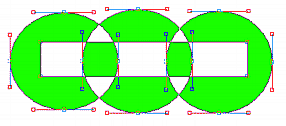
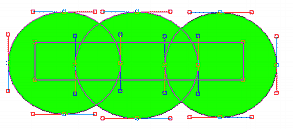
See Example
We created a Combination from Circle and Rectangle using Subtract method. That is - we subtracted the rectangle from the circle.

Now if we use Un-Combine we get back the Circle and Rectangle. Here on the Image below the objects are separated for illustration.
Now on the other hand, if we use Break Apart on the Combination object we get 2 Circle halves:
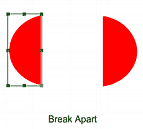
Break Apart command will create a new objects from the combination, it will not use the original objects stored in combination.
This gives you many possibilities for creating totally new objects:
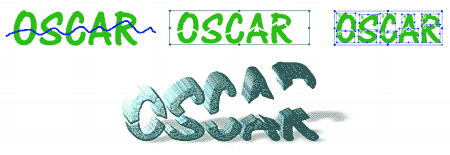
The steps in the example above:
Create Text, then paint with brush "Paint new Object" a line through the text (Image 1.). Select both objects (Ctrl+A) Then use Subtract. (Image 2)
Now use Break Apart - we get 10 objects (Image 3)
The rest is just a play. Here it is briefly: we selected the 5 object on upper part then use Combine Union. Selected the rest bottom part - again Union so now we have two object Top and Bottom part of the text. Little rotate and Extrude effect with Texture and few lights does the candy. The shadow was created by simply selecting both objects and use menu Bitmap-Create-Shadow from Selected Object. This gives us a shadow bitmap which we need to resize and Skew then apply some transparency to it.
![]() Note 1: For Combined Object there are two steps involved during Break Apart command. This is done automatically - to first create a Polynome from Combined Object. That means if you apply Break Apart on any Combined object Real-Draw will run two commands: Create Single Shape + Break Apart. But again this is just for your info, you don't have to worry about this.
Note 1: For Combined Object there are two steps involved during Break Apart command. This is done automatically - to first create a Polynome from Combined Object. That means if you apply Break Apart on any Combined object Real-Draw will run two commands: Create Single Shape + Break Apart. But again this is just for your info, you don't have to worry about this.
![]() Note 2: It is obvious that some Combination will always create just one shape. For example if you have an Union of two overlapping object the Break Apart command will have nothing to do and you will get result the same as the Union.
Note 2: It is obvious that some Combination will always create just one shape. For example if you have an Union of two overlapping object the Break Apart command will have nothing to do and you will get result the same as the Union.