|
Script Example |
  
|
|
Script Example |
|
SCRIPT for WEB/MM Extension
Script Examples
Nothing shows the idea of a script better than a few samples. "A picture speaks a thousand words!".
We modified the following example from Multimedia chapter by creating 2 buttons, one is the handle, and the second button is the sphere in the middle.
Because our goal was to show this image on a web page, we set the Over frame to be different, and left the Down frame the same as it was - Normal. A bit different from the other example for Multimedia Builder.
Note: You have all these scripts already typed, and listed in the Script List.
A Simple Generic Text file listing images and sizes
Now this is actually a normal txt file so it is a kind of dummy file, but it lists most of the script tags and sizes, so you can use it as a reference.
A simple generic text info Shows images, sizes and the position <#EXTENSION>txt <#SCRIPTSTART> Project dimensions: <#BGWIDTH> x <#BGHEIGHT> Background Image: <#BGFILE> <#LOOP> <#OBJECTNUM>. <#OBJECT> Label: <#LABEL> Normal Image = <#FILE0> Over Image = <#FILE1> Down Image = <#FILE2> --------------------------------------------------------------- Position = <#LEFT>,<#TOP> Size = <#WIDTH>x<#HEIGHT> ************************************************ <#END> Created by Real-DRAW |
First it lists the project dimensions, which is the same as size as the background image and then lists the name of the background image.
Now notice the part between <#LOOP> and <#END>:
First, it shows the number of the object, and the object's name. Then the next line shows the Label, and a list of the button's 3 frames, which are the filenames.
And lastly it lists the position, and the size of the particular button.
This is in between the LOOP/END tags and would be repeated for any other buttons you have.
We have 2
When you press the Test button the following will appear in the notepad:
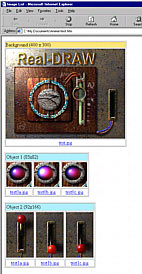
A list of all files with the preview on html document
We now want to display the files one after another (the files belonging to one object in a row) in a web page used as a simple reference. We will use HTML language with tables, but for this you'll need a basic knowledge of html.
A simple script lists all objects on the web page in a table. <#EXTENSION>htm <#SCRIPTSTART> <html> <head> <meta http-equiv="content-type" content="text/html;charset=iso-8859-1"> <meta name="generator" content="Real-DRAW"> <title>Image List</title> </head> <body bgcolor="#ffffff"> <table border="1" cellpadding="0" cellspacing="2"> <tr> <td bgcolor="#ffe782">Background (<#BGWIDTH> x <#BGHEIGHT>)</td> </tr> <tr> <td valign="top" align="center"><img src="<#BGFILE>" border="0"></td> </tr> <tr> <td valign="top" align="center"><a href="<#BGFILE>"><#BGFILE></a></td> </tr> </table> <p></p> <#LOOP> <table border="1" cellpadding="2" cellspacing="2"> <tr> <td colspan="3" bgcolor="#b2edfd">Object <#OBJECTNUM> <#WIDTH>x<#HEIGHT>)</td> </tr> <tr> <td valign="top" align="center"><img src="<#FILE0>" border="0"></td> <td valign="top" align="center"><img src="<#FILE1>" border="0"></td> <td valign="top" align="center"><img src="<#FILE2>" border="0"></td> </tr> <tr> <td valign="top" align="center"><a href="<#FILE0>"><#FILE0></a></td> <td valign="top" align="center"><a href="<#FILE1>"><#FILE1></a></td> <td valign="top" align="center"><a href="<#FILE2>"><#FILE2></a></td> </tr> </table> <p></p> <#END> </body> </html> |
This may look complicated, but that's because of the HTML tags. Basically it uses the same idea as in the previous example.
|
Press the test button, and you should see something like the image on the left. Simple! But it already shows some images! |
Web Page Rollover with JAVA Script
Now it gets a bit more complicated by using a Java Script. What we have below is a normal way of creating rollovers in Java Script.
But what is more interesting is that we actually used the LOOP/END pair twice (in blue). One is when we list the images for the Java variables and the second time is when we actually put the images in place.
![]() Note: This example simply ignores the background.
Note: This example simply ignores the background.
Simple Rollover script <#EXTENSION>htm <#SCRIPTSTART> <SCRIPT LANGUAGE="JavaScript"> <!-- Hide Script //-------------------------------------------------------------------- if (document.images) { <#LOOP> <#OBJECT>_normal = new Image(); <#OBJECT>_normal.src = "<#FILE0>"; <#OBJECT>_over = new Image(); <#OBJECT>_over.src = "<#FILE1>"; <#OBJECT>_click = new Image(); <#OBJECT>_click.src = "<#FILE2>"; <#END> }
function switchimages(sName,nEvent) { if (document.images) { if (nEvent == 0) sVal = 'normal'; else if (nEvent == 1) sVal = 'over'; else if (nEvent == 2) sVal = 'click'; else return; sObj = eval(sName + '_' + sVal + ".src"); if (document.images[sName]) document.images[sName].src = sObj; } } // End of JavaScript --> </SCRIPT> <#LOOP> <A HREF="" onMouseOver=" switchimages('<#OBJECT>',1); return true" onMouseOut=" switchimages('<#OBJECT>',0); return true" onClick=" switchimages('<#OBJECT>',2); return true"><IMG SRC="<#FILE0>" WIDTH="<#WIDTH>" HEIGHT="<#HEIGHT>" NAME="<#OBJECT>" ALT="" BORDER="0"></A> <#END> |
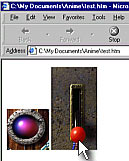
What is the result of this?
|
The script generated a page that shows both (2) buttons and when we move cursor above them they change the frame. For this reason we also adjusted the Over frame. With such a script, the highlighted frame is the one that gets most usage.. Note that we didn't add a URL, in the HREF html tag. That means that by clicking on the buttons we'd go nowhere. You can simply put the name here of another page, or a full URL. |
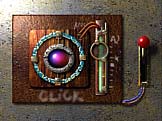
The complete interactive page using CSS
By modifying the script above and using Cascade Style Sheet (CSS) we will be able to display the whole document.
This is a script using CSS which exports the whole design You can set a URL link for each button by adding it to the label in a layer list. <#EXTENSION>html <#SCRIPTSTART> <html> <head> <meta name="generator" content="Real-DRAW"> <title>CSS Export</title> <style media="screen" type="text/css"><!-- #layer0 { position: absolute; top: 0px; left: 0px; width: <#BGWIDTH>px; height: <#BGFILE>px; visibility: visible } <#LOOP> #layer<#OBJECTNUM> { position: absolute; top: <#TOP>px; left: <#LEFT>px; width: <#WIDTH>px; height: <#HEIGHT>px; visibility: visible } <#END> --></style> </head> <SCRIPT LANGUAGE="JavaScript"> <!-- Hide Script if (document.images) { <#LOOP> <#OBJECT>_normal = new Image(); <#OBJECT>_normal.src = "<#FILE0>"; <#OBJECT>_over = new Image(); <#OBJECT>_over.src = "<#FILE1>"; <#OBJECT>_click = new Image(); <#OBJECT>_click.src = "<#FILE2>"; <#END> }
function switchimages(sName,nEvent) { if (document.images) { if (nEvent == 0) sVal = 'normal'; else if (nEvent == 1) sVal = 'over'; else if (nEvent == 2) sVal = 'click'; else return; sObj = eval(sName + '_' + sVal + ".src"); if (document.images[sName]) document.images[sName].src = sObj; } } // End of JavaScript --> </SCRIPT> <body> <span id="layer0"><img src="<#BGFILE>" border="0"> <#LOOP> <span id="layer<#OBJECTNUM>"> <a href="<#LABEL>" onMouseOver=" switchimages('<#OBJECT>',1); return true" onMouseOut=" switchimages('<#OBJECT>',0); return true" onClick=" switchimages('<#OBJECT>',2); return true"><IMG SRC="<#FILE0>" WIDTH="<#WIDTH>" HEIGHT="<#HEIGHT>" NAME="<#OBJECT>" ALT="" BORDER="0"></a> </span> <#END> </span> </body> </html> |
![]() Note: We used LOOP/END three times here, once for creating the styles, then for listing the files, and the last time for adding the styles to web layers.
Note: We used LOOP/END three times here, once for creating the styles, then for listing the files, and the last time for adding the styles to web layers.
|
Now, this is cool, we actually made a fully interactive web page with Real-DRAW. Any professional web page designer would be very proud! Note: The <#LABEL> command that we use as a html link on the button. You can enter a link, for example http://www.real-draw.com in the label field of the package, by double-clicking on it in the Layer Bar, which will allow us to go to that web page just by clicking on the handle. |
This of course is not the end of it. You can use Script Generator for many other things.
What about a script that will create a skin for some mp3 player?