|
Convert Nozzles from Paint Shop Pro
By Oscar
Note: Version 1.2 of PhotoBrush has already included internal
support for PSP Picture Tubes. When you creating an Image Nozzle
you have Import button for direct importing PSP nozzles. See step-by-step
below.
For version 1.0-1.1
To convert Picture Tubes into Photo-Brush format is easy because
I wrote an application to extract and create 32bit PNG files from
the Picture Tube (*.tub) in PSP.
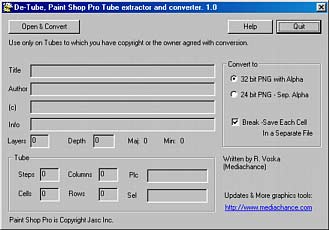
Tube Extractor will convert the Picture Tube from Paint Shop Pro to the PNG format (which is supported by all new graphic applications and web browsers)
You can benefit from applications supporting 32 bit PNG because Tube Extractor will save the image and the Alpha channel into the PNG 32. (Photo-Brush supports loading nozzles from 32 bit PNG)
However even if your application doesn't support 32 bit PNG and it supports only 24 bit PNG (without the Alpha channel), you can let Extractor to save the image in one PNG file and the Alpha (or mask) in the another file.
By default the Extractor let you to break the image into individual cells saved in separate files.
How to use it in Photo-Brush.
1. Run TubeEx
2. Leave the options as they are default.
3. Click Open & Convert button, find a *.tub file and the rest will be done automatically. The output files will be saved in the same directory as the tubes. They will be renamed with png extension.
4. If you want to create brand new library copy a file emty.brs from the folder Photobrush\Brushes into Photbrush\Brushes\nozzles. Then rename it to whatever you want. This will create an Empty library in the Nozzle brushes
5. In Photo-Brush click the Image nozzle Tool and with the Library Browser Arrows (a small arrows on the right side of Brushes Bar) find the Library Set where you want to add the new Nozzle
6. Click on the small arrow on the bottom of the Brushes bar and from menu select Add.
7. On the new Brush Properties select Image Hose Type and click the Settings. You will get into the Nozzle maker, where you just load all the cells one by one.
8. Now just add the 32-bit PNG images one by one into the list. They should came with full transparent channel.
Software:
Download the TubeEx.zip here
For version 1.2
1. If you want to create brand new library copy a file emty.brs
from the folder Photobrush\Brushes
into Photbrush\Brushes\nozzles. Then
rename it to whatever you want. This will create an Empty library
in the Nozzle brushes
2. In Photo-Brush click the Image nozzle Tool and with the Library
Browser Arrows (a small arrows on the right side of Brushes Bar)
find the Library Set where you want to add the new Nozzle
3. Click on the small arrow on the bottom of the Brushes bar and
from menu select Add.
4. On the new Brush Properties select Image Hose Type and click
the Settings. You will get into the Nozzle maker.
5. Now just click the PSP Picture Tube Import button and
load the *.tub file. You may be asked to specify number of rows
and collums if this info can't be find in the file - the image preview
of the *.tub file will help you to count the columns and rows. The
Tube will be loaded into Nozzle. You can import another tube if
you want to the same Nozzle file. This will append the images to
the existing ones.
Find many Picture Tubes for example here. Always read Terms of Use.
|