Things to do and things to avoid |
  
|
Things to do and things to avoid |
|
Not everything works all the time.
Photo Blend offers lot of magic, but it may not work exactly as you would imagine in every situation.
Generally you want to mix detailed object with detailed backdrops. In fact, the more detailed backdrop is the more Photo Blend can hide masking problems in it. It is like hiding in a shadow, but for Photo Blend the details are the shadows.
Things to do:
Do: Use large objects
Don't try to pickup a small object from a photo. You will most likely not succeed.
The good part of doing composition is that we can get good objects from many photos and combine them into new scene. But the key is that on each of the sources, this object should reasonably large. Things go much better if we have a lot of pixels to work with.
Do: Learn to use Inverse masking technique
On many images, inverse masking works better. There are many ways to do it, here is one:
My personal steps of masking Mt. St. Michel were like this:
1 - Magic Wand, select the sky
2 - Press Invert button, inverts everything
3 - with curve or free curve tool draw curve around the object I want
4 - when the curve is closed it will create mask over it, don't worry
5 - click Outside button, the mask will be now outside the curve
6 - click Subtract button, everything outside the curve is cleaned
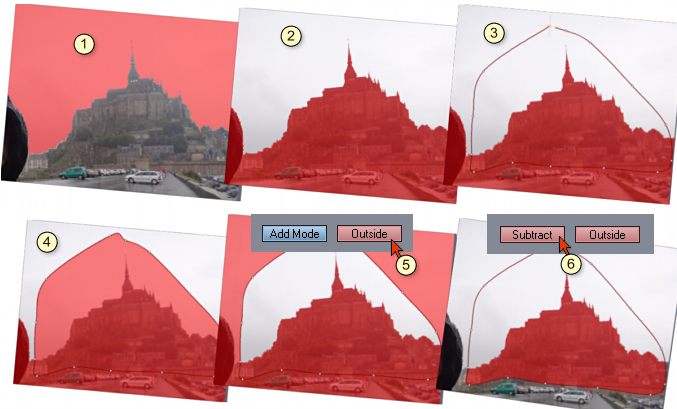
And I have pretty good mask.
Do: Start with a sharp mask then soften it as needed
When painting mask, use sharp mask when you start and add soft mask only to parts that require it (for example you need to blur the object into the backdrop)
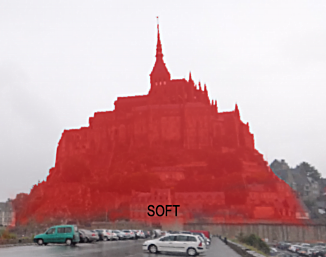
On my Mt. St. Michel image everything is sharp except the bottom and bottom sides so it blends with the surrounding.
Do: Remember the Backdrop is the key
Everything in Photo Blend does revolve around the backdrop.The object will get colors and ambient light from the backdrop, the final render will be the size of backdrop.
The colors of the object heavily depends where on backdrop the object is positioned.
If you want colorful objects, place them in front of colorful backdrop (or part of the backdrop that is colorful).
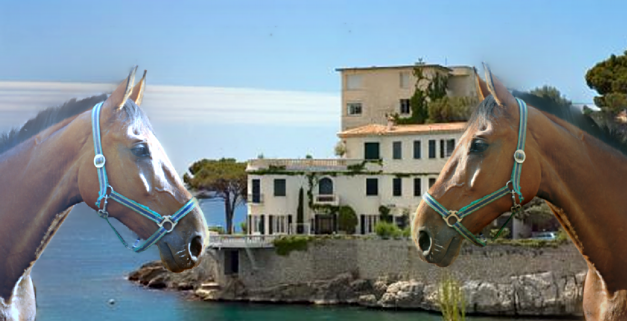
Those two horses are clones. But one picks light from the bluish part of the sea and sky while another is in front of colorful building.
Things to avoid:
Avoid: Dark object on light backdrop
The light from backdrop will try to wrap around your black object in a fashion that will look like a smudge.

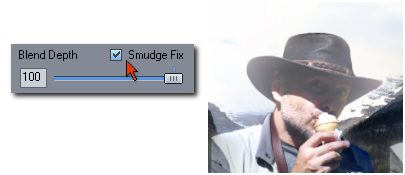
You can put a dark object against a dark background as the image of three caballeros suggest. But the middle one, is clearly a lost case.
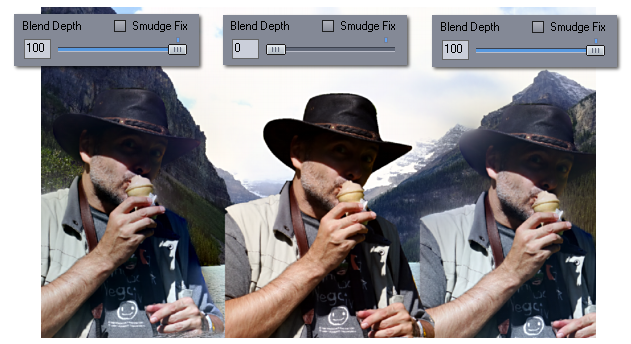
Can this be fixed? Yes, couple of ways and it all involves changing the Blend Depth some way.
 .
.
Bringing Blend Depth down will make the object look all right, but it is no longer a Photo Blend object, there is no automatic correction for colors and masking. But we can color correct the object manually and we can create better mask.
There is also the check box that says "Smudge Fix" which will switch on the Dynamic Blend Depth.
What it does is to change the Blend Depth dynamically and thus preventing the smudge over the background. This is a more friendly way of adjusting Blend Depth, but it still needs better masks at least in the area of the light backdrop.
There are more of those fixes, one is for a white halo. They can be found in menu Object - Dynamic Blend Depth.
The most obvious fix is to actually move the object from the bright background somewhere else.
Avoid: Plain Backdrop.
A flat backdrop without much details will make the Photo Blend suffer to fix bad mask and we may see smearing or halo. (See how to remove them)
Photo Blend works on hiding bad masking in the details. Plain background and lousy mask will not fit well.
Avoid: Soft (blurry) Masks for hairs
Soft masks may seem like a good idea for hairs or other hard to mask fluffy things, but that isn't true. Soft blurry masks are hard to control as they select everything under them semi-transparently... for hair that means both hair and the background around the hair is semi-transparent. This is hard for Photo Blend to pick the right thing.
Photo Blend understand hard mask as to blend with sharp details while a blurry mask means a gradual blend. A careful examination of the images will show the difference.
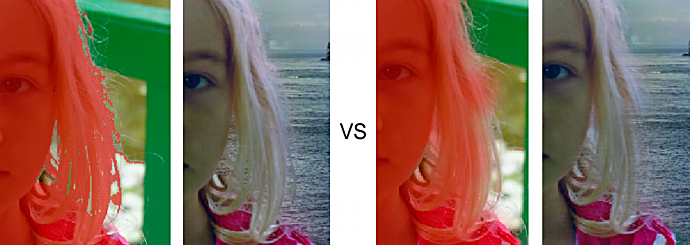
Since soft masks over hair will indiscriminately select also parts of the background, soft masks in Photo Blend tends to create color halo.
The best way I figured out doing this type of things is to use sharp brush and paint the face and everywhere where things are solid, including parts of hair, then use Magic Wand and try to pickup the rest of the hair with it. There is also example with using selection.
Avoid: Forcing it
Sometimes a backdrop will not work properly with any object. Sometimes an object couldn't work properly no matter what. Sometimes the same object will work just fine in other backdrop.
The key is, if things evidently do not go well, do not insist of making them work no matter of what. Try different combinations of backdrop and the object, you may also lower the Blend Depth (but you will loose a lot of color-corrections and mask hiding). But if it simply doesn't work, don't spend more time on it, press the magic remove (delete) button and get a new source or backdrop.