|
Scan on the road
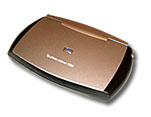
 The HP 1000 photo scanner is a miniature version of a flat-bed scanner. I have seen this item on sale in many stores. With the low price of regular sized scanners it is a bit puzzling who HP thinks is the intended buyer for this item. The HP 1000 photo scanner is a miniature version of a flat-bed scanner. I have seen this item on sale in many stores. With the low price of regular sized scanners it is a bit puzzling who HP thinks is the intended buyer for this item.
It is hard to imagine a user who would say "Dude, the maximum 6x4 area is just what I always wanted!" and buy this for the original $99.
So logically I found a whole bin of these in a computer store on sale for about $30 CAD after the rebate. After playing with it for a few minutes I must say that the $30 CAD is just about the right price for this toy.
First of all the scanner is a USB device similar to a card reader. It doesn't even have its own power supply and it doesn't behave as a scanner at all. Actually I wasn't prepared for this, I had to read the manual to realize that the scanner installs itself as a removable drive. When you press the only button on the scanner it simply create a single file on the removable drive which you can copy to your hard-drive. After searching HP site I found out that there is no way to use this scanner as a TWAIN device and there is no way to do any settings adjustments. Quite funny way of scanning.
Anyway, after realizing this the installation was very easy. I simply plug it to my computer and it created a new G:\ removable drive. Now put an photo under the cover, press the button and after few sec a file SCAN1.JPG appeared on the removable drive.
Quality
It has CIS (contact image sensor) scan head with an optical resolution of 300dpi. But being a very simple device the quality is lower than most of the 300dpi scanners. Not really bad, but neither great. A "fine" would be a fair name.
Another interesting "invention" is that the scanner saves the images always in portrait mode, probably just to save some processing. The images are always 1200x1800 "portrait" images.
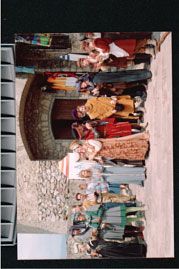
But there is one more interesting thing. For some reason the cover is created such way so it has a little gray piece sticking into the scan area which always appear on the scanned image on the left side. (See image below) The piece appear behind the photo so it isn't a real problem, it just bothers me every time I look at it. There is one simple thing you can do - cover this piece with a black tape. It is surprising why they didn't think of it at HP.

Good things
Yes, the scanner has also a positive side. First it is really lightweight and made all of sturdy plastic (also the "glass"). There is nothing which can really break inside or outside. Because of its sale price I had no problem to throw it to the luggage and let the airline workers play a soccer with it.
So it can travel with you everywhere and because it has no power supply you don't have to worry about conversion. This makes it actually quite an interesting item for travellers. I took it to Europe for my last trip and (after I created a little software for it) I was able to scan many family photos from treasured albums.
There is another nice feature of this scanner. Being a lazy person I soon realized I can actually use it to scan pictures without removing them from albums. Simply take the cover off and place the scanner on top of a page!

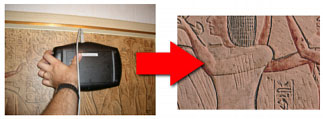
If you are really obsessed with taking a copy of everything in the room you can scan even pictures still hanging on walls or the wall itself .... in 6x4 tiles but there is nothing like a burst of creativity.
The scanner is a great for travellers and people who like to play, but otherwise I would suggest to grab something more scanner-like.
|
|
Oscar's MiniScan
The major problem I had with this scanner was the need to copy each picture from the removable drive to hard-drive, then eventually rotate the images to landscape.
So to make it useful, I created Oscar's MiniScan.
This software works only with this type of scanner. It simply watch the removable device and if a new single picture appears there it will copy it to the folder of choice. Also it will allows you to rotate the picture.
Nothing too fancy but it actually make scanning pictures much faster.
How to use it
First you have to plug the scanner and then press Refresh button to select the scanner removable drive from the combo box:
The next thing is to choose the destination folder on your hard-drive:
Now it is a time to press the scan button on the scanner. You can't control it from the software.
As soon as a new image appears on the removable drive, it will be automatically copied to the destination folder. The file will be renamed so it never over-write any existing file and then displayed in the preview
The next thing is to rotate image. You can quickly rotate the copied file in the destination folder after it is displayed. (Press spacebar to rotate it Clock-wise).
It is loseless so it doesn't need to ask you for confirmation, it simply overwrite the destination file as soon as you press the button.
Then after playing with it a bit I added AutoCrop feature. Unfortunately because of the plastic cover thing sticking into the area it is actually very hard to make automatic crop from left. So I simply crop it from top, bottom and right and then assume the picture is 5:7 ratio and calculate the left side. This somehow works for me.
Then after a bit of thinking I added Undo for this automatic crop - in case it doesn't work :-)
Pressing the Undo second time will return the cropped image so you may decide which one to keep.
What else? Well it is free, which is quite an asset.
Download (750kB)
 If you see anything interesting on this site which you think would be worth for your friends to know, simply click this button:
 The link to this page will be included automatically.
No SPAM! Neither you, nor your friend will become part of ANY mailing list.
|
|
