Windows 7,8,10 (5MB)

THE ULTIMATE SOLUTION FOR WINDOWS MACROS


Version 2.28
Project 2 - Adding Script
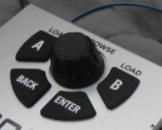
This is a continuation of Project 2 Now it is time to make some more advanced logic for photoshop. At current I have mapped the 4 buttons inside the arduino program as followed V, B, Alt and Z. That already work in Photoshop, but it isn’t flexible enough. I decided to keep the Alt because when pressed I can use it as color pick or zoom with mouse wheel. I am going to remap the three other buttons to stuff I use.
After some experimentation I decided on the following:
When I press A it switches to Brush and the Rotation Knob will adjust brush size
When I press B it switches to Brush and the Rotation Knob will adjust brush opacity
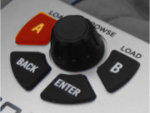
When I press Back it will cycle between Move Tool and Laso
I will leave the Enter as it is on Alt.
When not in brush mode the Rotation Control will adjust zoom
This logic is an excellent task to exercise the new script language in Multi Keyboard Macros. Of course I can also make the logic inside the arduino program itself to make a dedicated device but then I
likely want to tweak it over the time and with Multi-Keyboard Macros it is not only much easier but also I can display a label on the screen telling me what function I am using - which is a big bonus.
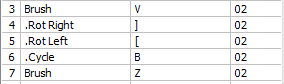
Most of the logic will be inside the rotation knob which are mapped in arduino to [ and ] keys.
The other keys will be mostly modifiers what the rotation control does.
Most of the logic will be inside the rotation knob which are mapped in arduino to [ and ] keys.
The other keys will be mostly modifiers what the rotation control does and the tool cycle button
So lets do the tool cycle button (BACK on my keyboard) first
if GLB_cycle==0 then
SendKeyStroke("V")
DisplayText("Move Tool")
endif
if GLB_cycle==1 then
SendKeyStroke("L")
DisplayText("Laso Tool")
endif
GLB_cycle = GLB_cycle+1
if GLB_cycle>1 then
GLB_cycle = 0
endif
GLB_rotMOD = 0
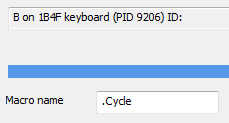
I will name the Macro itself with a dot in front so its name will not show on screen as I want to use my own labels
inside the script
This will use global GLB_cycle variable. Any variable that has prefix GLB is global and it means it is persistent (remembers its
value) even after script will finish - and that’s what we want.
So if it is 0 then we press the V key for Move tool and display the text on screen
When it is 1 we press L key for Laso and display that on the screen
Now since this is a cyclic button, add one
since we have only two states 0 and 1 everything larger than 1 will return back to zero.
The last line makes more sense later after we add the GLB_rotMOD in next script
That takes care of that button, now if I test it inside photoshop it switches between Move tool and Laso as I wanted.
Next are the two brush keys. they both will switch to Brush but in one (A) the rotary knob will change the brush size, with the other B it will change opacity
GLB_rotMOD = 1
SendKeyStroke("B")
GLB_rotMOD = 2
SendKeyStroke("B")


There isn’t too much to do in either of them
A global variable GLB_rotMOD will remember which button was pressed and it will also send
B to keyboard buffer so the brush tool in photoshop will activate with either of these keys.
The majority of the work will be done in the rotary controller. In the arduino we sent ] when rotary controller is turned clock wise and [ when it is turned counter-clock wise. The
functions will be more or less a mirror of each other. Again we will name the macro with prefix dot, just not to display its name on screen as we will do it inside.
if GLB_rotMOD == 1 then
SendKeyStroke("0xdb")
DisplayText("Brush Size -")
end
endif
if GLB_rotMOD == 2 then
GLB_opacity = GLB_opacity-1
GLB_opacity = MAX(0,GLB_opacity)
GLB_opacity = MIN(8,GLB_opacity)
str = CHAR(49+ GLB_opacity)
SendKeyStroke(str)
DisplayText("Brush Opacity "+STR(10*(GLB_opacity+1)))
end
endif
SendKeyStroke("CTRL 0xbd")
DisplayText("Zoom -")


if GLB_rotMOD == 1 then
SendKeyStroke("0xdd")
DisplayText("Brush Size +")
end
endif
if GLB_rotMOD == 2 then
GLB_opacity = GLB_opacity+1
GLB_opacity = MIN(9,GLB_opacity)
str = CHAR(49+ GLB_opacity)
str = GLB_opacity<9?str:"0"
SendKeyStroke(str)
DisplayText("Brush Opacity "+STR(10*(GLB_opacity+1)))
end
endif
SendKeyStroke("CTRL 0xbb")
DisplayText("Zoom +")
If we press the button A then the GLB_rotMOD will be 1
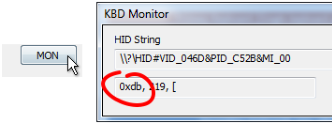
We need to send keyboard strokes “[“ and “]” respectively in the rotary controller Now, there isn’t really a hardware key stroke [ - because it is a key that has two functions depending on shift and
probably your local keyboard as well.
We can open the monitor and then press the keys [ and ] on our normal keyboard - just to see what HEX hardware code they have, so it turns out those keys are 0xdb and 0xdd
Alternatively we can use SendText("[")which will type that character in the keyboard buffer. In case of Photoshop this works fine. In some other apps SendText may not necessary work for
shortkeys, it is more a typing command (as in type into edit box) than pressing a hardware key. SendKeyStroke is the most universal for shortcuts so I will stick to it.
In case of GLB_rotMOD == 2 we want to change opacity of the brush, which in photoshop is done by pressing numbers 1,2,3…0. The only drawback is that in ASCII the 0 is first as char 48
and 9 is last but for photoshop the 0 is the last, so it goes 1,2,3,4..9,0 while in ASCII we have 0,1,2…9
So we will need to put some condition.
the GLB_opacity is the counter for opacity and basically the code within the block either decreases it or increase it and then make sure it doesn’t go over the limit. Unlike the switch counter,
we don’t want to rewind it back once we reach the limits on either side, just stay there.
Once we have opacity counter we can create the character that needs to be sent to buffer. In case of decrease, it is just:
str = CHAR(49+ GLB_opacity)
ASCII 49 is the key for ‘1’ and so the equation returns characters 1,2,3…9, that’s all we need in the counter clockwise movement
In case of increase we also have the last pesky “0” that is out of order in ASCII.
str = CHAR(49+ GLB_opacity)
str = GLB_opacity<9 ? str : "0"
That’s why we also have the conditional argument next. It simply says the string is fine when GLB_opacity<9 but anything other (which means 9 in our case) means full opacity and that
needs to send key “0”
After sending that key to keyboard buffer we also display a little label on the screen telling the actual opacity we are setting. That’s the STR(10*(GLB_opacity+1)) string.
That’s it.
Now if you see all if blocks also have end inside them. That will simply stop the script right there and it will never continue any further.
That allows us to put the last lines to send CTRL + SendKeyStroke("CTRL 0xbb") and CTRL - SendKeyStroke("CTRL 0xbd") which is in photoshop the zoom command.
So if nothing from the above was processed then the zoom command will be in place. And if you scroll back to see what we put as last line in the first button we made was GLB_rotMOD = 0
Breakdown of the above scripts
This above example should be taken as a tutorial on how to create logic in Multi-Keyboard macros on a real-life example.
Get Updates


About MediaChance
Products
Links